Our first unfortunate taste of winter in Minneapolis came a couple weeks ago with the unexpected (and unwanted) snowflakes on October 11th. It was a good reminder that you know what is coming. Soon. A little effort invested before the landscape turns white will yield worthwhile benefits in energy costs, comfort and peace of mind.
Here’s a handy pre-winter checklist to help identify and fix issues on the exterior of your home before old man winter visits.
Check Weather Seals, Weather Stripping and Door Gaskets
If you feel a draft coming in under your exterior doors, there are two simple things to check. First, how tight is the door sitting against the weather stripping where the door meets the door frame? If obvious gaps are present weather stripping is available at hardware stores and it’s relatively simple to install. The second thing to look at is the threshold. If it is adjustable, use a screw driver to raise it up so that it contacts the door sweep. If it is not adjustable, you can purchase a retrofit door sweep that attaches to the inside of the door to keep drafts from coming in under the door.
Seal Windows
Check to make sure all of your windows are closed and locked. Failing to engage the locks (if you have them) can increase unwanted air leaks by 30%. Next, consider applying window film to windows that are hopelessly drafty. Such film kits can be purchased at just about any hardware store and applied on either the inside or outside of the window. Ultimately, it is ideal to replace drafty windows but window film can work wonders for you between now and then.
Install Heat Tape Where Needed Remember the terrible ice dams from last winter? We do, because many of you paid our sister company The Ice Dam Company to remove them with steam. It is admittedly expensive work and not the way anyone wants to spend their hard-earned cash. If you find yourself without the budget to re-insulate, heat tape is a good option. Be absolutely certain to use the correct type, however, as the cheap, constant wattage heat cable available at hardware stores is worse than installing nothing at all. Instead, use a high-quality, self-regulating heat cable such as Heat Tape Pro, by Radiant Solutions Company. There are ‘professionals’ in our area installing constant wattage heat cable, so always ask about what is being installed when receiving estimates to avoid wasting your money.
Shut Off Outdoor Water Lines, Faucets and Hoses
Make sure to shut off and drain any external faucets or sprinkler systems. You should also disconnect and store your garden hoses. Failure to turn off water to the exterior faucets can cause your pipes to burst just inside the wall cavity, causing thousands of dollars in damage.
Check for Gaps
As you inspect the exterior of your home, look for gaps between the siding and window frames and doors. Thoroughly fill any noticeable gaps with caulk. It’s an inexpensive way to fix air leaks and it will help save you money on energy bills, not to mention keep unwanted pests from living rent-free in your home over the winter.
Clean the Gutters
Remove leaves and other debris from your gutters to help promote good water movement away from your home throughout the fall, winter and spring. The majority of flooded basements in our area could be fixed or greatly improved by operational gutters around the home.
Inspect Your Roof
While you’re checking on your gutters, make sure your roof can handle the abuse winter doles out. We don’t recommend homeowners climb their own roof due to the inherent risk but even a novice can make solid observations from the top of the ladder. Are the shingles cracked or blistered? Are there any holes through the roofing material? Finding and fixing these deficiencies before winter can save a lot of hassle (and money).
Inspect Chimney and Flue
Check to make sure the chimney is clear of any nests from birds, squirrels or other small animals. Check the damper. Make sure it opens and closes fully, and that it is can be locked in the open or closed position. Check the chimney draft. Make sure the chimney will draw up the fire and smoke properly. Have the chimney cleaned. If it has been several years (or never) since you had your fireplace chimney cleaned, have it done by a professional chimney sweep. This is not a pleasant DIY project, and professional cleaning is not very expensive.
Winterize the Air Conditioning Unit
Cover the condensing unit: Left unprotected, the condensing unit can be damaged by wet leaves and debris that contribute to rusting and freezing of internal components. Although these units are designed for outdoor use, covering them with a breathable waterproof cover made for that purpose goes a long way to extending the life and efficient performance of the unit.
Mind Your Foundation Inspect the perimeter of the foundation and seal any openings with foam sealant. Install covers over crawlspace ventilation openings. Cover basement windows with plastic shields. Rake leaves and debris away from the foundation. Tuck-point or seal foundation cracks and other openings to keep out mice and other pests.These maintenance tips may help ensure your home’s exterior stays safe and sound during the winter months.
In the Early morning hours of Thursday July 18th, a Hail Storm quickly swept through the souther metro causing Damage to cars, homes and businesses. Several of the Local Twin Cities News Outlets were quick to report on the Hail Damage:
Kuhl’s Contracting sent out notification to all of our clients on Burnsville, Savage and Prior Lake to be on the look out for hail damage to their roofs. We have a 2-Part Guide on How to Spot Hail Damage on Your Roof:
It’s also good to acknowledge that when there’s a weather event that causes damages to homes, your will often have Storm Chasing Contractors who like to take your money, do a (often a crappy) quick Job and get out of town. We have a Case Study on Storm Chasers that Can be helpful to know after Home Damage from Hail Storms:
Let Us Know if You Suspect You Have Hail Damage on Your Roof
Here at Kuhl’s Contract ting, we’ve dealt with storm damage for 30 years. We have in house experts that specialize in dealing with Insurance and advocate for our clients. Click to learn more about our Hail Damage Repair Services:
After being brutalized by this winter, many of our clients are considering a permanent move to a warmer place to avoid the headaches associated with ice dams in the future. It’s true that Florida has certain advantages, but we may have a cheaper solution. Heat cables and Heat Tape.
In combination with our sister company (or is it brother?) The Ice Dam Company, we install a ton of heat cables (often called heat tape, heat coils or heat trace) here in Minnesota. Not many people actually understand how to properly design, source and install ice dam prevention cables and as a result we are often called in to tear out and reinstall existing heat cable jobs. We install pre-terminated plug-in heat cables that are simply plugged into existing outlets and we install custom heat cable systems for both 120 and 240 volt applications. Each system has it’s advantages and our sales people can give you the proper guidance as to which is better for your home or business.
When adjustments to the insulation, ventilation or architecture are not feasible, a high-quality heat cable is the best answer. “High quality” is the key aspect to keep in mind because most of the heat cable installed in Minnesota is just the opposite. Homeowners, handymen and contractors alike fall into the same trap. They buy ice dam prevention cables from Home Depot, Lowes, Menards or their local hardware store, thinking they’ve found the answer to their ice dam woes. In fact, what they have purchased is most likely a disposable product called ‘Constant Wattage Heat Cable’. The differences between self-regulating cable and constant wattage cable are too vast to list here but know this, if you are looking for many years of reliable ice dam prevention you should buy a high quality cable. After all, you’re paying for the labor to have a system installed either way. Constant wattage cables like Easy Heat, Frost King and Heatit offer temporary relief at best, and at worse can actually start on fire if you don’t monitor the leaves and other combustibles around the cable system. We use Heat Tape Pro, by Radiant Solutions Company. Our strategic partnership with that manufacturer means we get great pricing on the best self-regulating heat cable on the market.
We install heat cable systems on flat roofs, metal roofs, wood roofs, slate roofs, rubber roofs and more. Each system require it’s own set of specialized heat cable accessories and the right technical skill to install it. Kuhl’s Contracting knows this topic inside and out. Click here to get a free estimate for your ice dam prevention heat cable system.
Many of you are aware that we operate a division of our company that specializes in ice dam removal and prevention in the greater metro area of Minneapolis and St. Paul called The Ice Dam Company. We are the oldest and most likely largest ice dam removal and prevention business in the United States and the only such company directly linked to a large exteriors and remodeling company. Good stuff. What we have seen this season in the Twin Cities was pretty remarkable, even by Minnesota ice dam standards. It’s safe to say that this year has ranked in the top 3 worst ice dam seasons in the past 25 years, with thousands of homes being badly damaged as the result of water intrusion relating to ice dams. The Ice Dam Company has been working seven days a week to stay on top of demand and we haven’t even come close to addressing all of the calls and emails we received. That brings us to the topic at hand: Copper gutters and ice damage.
We are currently receiving an unusual number of calls from clients whose gutters have been damaged by ice and snow. This is a phenomena that affects homes with steeper roofs mostly, in particular with cedar and slate roofing systems because they tend to be quite slippery. The less frictional resistance that the roofing material offers, the more likely ice and snow will slide off, taking the gutters along for the ride. Fixing issues relating to ice and snow damage to gutters is relatively simple. Simple but not always cheap. Copper gutters a the most expensive systems used and when those gutters are integrated into roofing systems like slate or tile the replacement of said systems can get very, very expensive, often involving the removal and replacement of the lower 2-3 feet of roof adjacent to all affected areas.
The next obvious topic relates to preventive this sort of damage in the future. The only real solution is to install a series of snow guards to reduce the velocity of the snow and ice that may hit the gutter system. Such guards usually cost $15-$25 per piece before installation, with factors such as roof pitch, job height, access and roofing system playing a significant roll in the final project cost. It’s not unusual to spend $30-$40 per piece for labor and materials to install snow guards.
The cost for a new asphalt roof in Minneapolis ranges from roughly $325 to $600 per square. A square is a roofing term for an area equal to 100 square feet. Most roofs in the Twin Cities fall into the range of 20 to 100 square. I know, doing the math on the two figures presented so far means that your new asphalt roof costs somewhere between $7,100 and $60,000. Not super helpful data so far. Let’s dig deeper to uncover the actual factors that determine how to determine the cost for a new shingle roof.
Calculating the Cost of an Asphalt Roof
New Roof Cost Factor #1: Roof Size
There are a number of variables that affect the cost for a new shingle roof. First, and most obvious is the size. The larger the roof, the greater the cost. Greater roof area translates directly into more materials, more labor, higher permitting and hauling fees.
New Roof Cost Factor #2:
Shingle Material
Unlike cedar roofing, the price for a new asphalt shingle roof can vary widely depending on the material choice. In other words, there is a wide range of cost, color, style and performance possibilities in the asphalt shingle world. One could go to Home Depot and purchase a super cheap, basic three-tab asphalt (think of your grandmas roof) or one couple buy a super high-end designer asphalt shingle from a specialty supplier, or anything in-between. The asphalt shingle cost alone can range from $68 per square to well over $280 per square. Most of the asphalt shingles Kuhl installs on Minnesota homes falls into the ‘designer’ asphalt category because people usually see the value over the long run.
New Roof Cost Factor #3: Roof Complexity
There are a dozen roof styles out there, from mansard to gambrel, from hip to gable, to shed and mono-pitch. In Minneapolis, most asphalt roofs are either a hip or gable style. Knowing the difference isn’t important for this discussion but suffice it to say that some roofs are more complex than others. They have more facets, valleys, dormers, architectural features and intersecting roof planes. The greater the roof complexity, the higher the roof replacement cost. Giant, uninterrupted roof planes are much easier to complete that multiple, intersecting roof planes.
New Roof Cost Factor #4: Roof Pitch (or ‘Slope’)
cost for a new shingle roof is pitch. In the roofing business we define pitch according to units rise to units of run. A 3/12 roof pitch implies that for every twelve inches of horizontal travel there is three inches of vertical rise. Therefore, a 3/12 roof is much flatter than a 12/12. The primary cost difference between flat and steep slopes in asphalt shingle roofing relates to labor. The material cost does not change drastically with changes in slope but labor costs increase quite a bit. Steeper roof pitches require that every move is made under roof and harness, which greatly slows down the process of reshingling a roof with asphalt shingles.
How to Save Money on the Cost for a new Shingle Roof
As with any contracting performed on your home, you can make cuts out of labor or materials. But as with anything you buy in the free market, you generally get what you pay for. Hiring cheap contractors seldom results in something good. Likewise, given that the labor is almost the same for installing cheap asphalt shingles as it is expensive asphalt shingles, we always recommend spending a little extra on quality. Once and a while our suppliers run specials on certain types of asphalt shingle roofing. When this happens we let clients in the estimation phase know about the opportunity. This can result in saving 5-10% off the material cost in some cases.
Let Us Know if We can Help Determine the cost of Your Roof Project
If your considering replacing your roof and are looking to find the cost for a new shingle roof to plan your project budget, the best way is to talk to a project manager who can help you find the appropriate plan for a roof cost that is best for you. Contact us today if you’d like to discuss.
Tips on grading the cedar roofing material that shows up at your home for your roofing job.
Introduction, by Steve Kuhl
There are many variables that factor into the quality and character of cedar shake and shingle roofing including the age of the tree when logged, the region the tree came from, the thickness of the material, its’natural oil and resin content and the percentage of clear heartwood in each piece. Perhaps nothing has a more immediate impact on longevity than grain orientation, however. Put simply, the more edge grain (aka ‘vertical grain’) the better. One of the favorite tricks roofers use to reduce the cost of their estimates is to source their material through lower quality mills. The point is, regardless of the color of the Label, vertical grain content is an easy identifier that anyone can use to determine the relative quality of cedar shake and shingle roofing and siding.
Telling the Difference Between Vertical and Horizontal Grain
View looking at the butt end of two cedar shakes
Vertical Grain vs. Horizontal Grain
Vertical grain is also called ‘edge grain’, ‘vertical sawn’ and often carries the designation of Premium on the manufacturers label. To be characterized as Premium, each bundle of cedar shakes must contain 100% vertical grain shakes. Horizontal grain is also called ‘flat sawn’ and ‘edge grain’. 95% of the roofs applied in Minnesota are certified as #1 Grade, Blue Label material, which are certified to contain no more than 20% horizontal grain. In short, Premiums are 100% vertical grain and #1 Grade are at least 80% vertical grain. The more vertical grain the better. If you can afford 100% vertical grain it is a good investment.
Flat Roof In Minneapolis Leaked for Years and Copper Was the Answer
The Problem:
Perhaps you have heard it before. There are two types of at roofs: Those that are leaking and those that are about to leak. In fairness to flat roofs, the reality is that there is no truly permanent roof. When at roofs fail they usually have more dramatic and immediate problems (rot, mold, collapsed ceilings, etc.). The project featured in this Case Study was no exception.
The demands placed on flat roofs in Minneapolis create a unique set of challenges to even the most robust systems. The flat roof here was a 10 year old rubber membrane roof (aka, EPDM). Over the past few years as the leaks got worse and worse our client had a few contractors attempt to x the problem. By the time we arrived it was clearly a case where total replacement was warranted.
The Solution:
As with most residential construction challenges, proper diagnosis of the problem is the best place to start. We used our thermal imager after a long rain storm to look into the ceiling. The resulting images indicated three separate leaks, confirming the idea that roof replacement was smarter than repair.
We gave our client two material options including TPO membrane and copper. They choose copper because this roof was visible from the master suite and they wanted a touch of architectural character. Years later the roof is still leak free.
New at seam copper roof during installation by Kuhl.
Project rendering. We are the only at roof contractor in Minneapolis that has in-house project design talent. Our clients have come to appreciate our ability to show them exactly what they are buying before the project begins. Projects like this should only be done once.
Here is a basic description of the most common cedar roofs installed in Minnesota. We offer much deeper info on each in other Kuhl Case Studies.
Four Most Common Cedar Roofs Installed in Minneapolis.
16” Machine Sawn Shingles (Lifespan 17-21 Years)
Cedar shingles are used for both roof and side wall applications and offer a lighter, more refined appearance than hand-split shakes. Certain architectural home styles are more appropriate for Sawn Shingles which is the primary reason they are chosen in our experience. On average, this material ranges from 1/4” to 3/8” thick at the butt end and is installed with 5” courses. Expect to get between 17 and 21 years of service out of an unmaintained Cedar Shingle roof in Minnesota. Approximately 13% of Twin Cities cedar roofs are done in Machine Sawn Shingles.
18” Tapersawn Shakes (Lifespan 19-24 Years)
The least common material we see in the Twin Cities, the Tapersawn Shake is essentially a hybrid between a common 24” shake and a 16” shingle. We frequently urge clients to consider using Tapersawn Shakes instead of 16” shingles because they offer the same clean, architectural appearance but are substantially thicker. Remember, when it comes to cedar roofing, thicker is better (all else held equal of course). On average, this material ranges from 5/8” to 3/4” thick at the butt end and is installed with 7”courses. Expect to get between 19 and 24 years of service out of an unmaintained Tapersawn Shake roof in Minnesota. Approximately 1% of Twin Cities cedar roofs are done in Tapersawn Shakes, but that percentage increases each year as more people become familiar with it.
24” Medium Hand-Split Shakes (Lifespan 19-24 Years)
The most common cedar roofing material used in Minnesota, Medium Shakes are the workhorse of the industry. They are the go to choice for home builders primarily because it is the most affordable wood roof. The wide variations in quality from one load of Medium Shakes to the next also allows roofers to cut costs significantly, thus creating the perception of more value and increasing the likelihood Mediums will be selected (over tapersawn or hand-split heavy shakes, for example). On average, this material ranges from 1/2” to 5/8” thick at the butt end and is installed with 10”courses. Expect to get between 19 and 24 years of service out of an unmaintained Medium Shake roof in Minnesota. Approximately 70% of Twin Cities cedar roofs are done in Medium Shakes.
24” Heavy Hand-Split Shakes (Lifespan 25-30 Years)
The second most common cedar roofing material used in Minnesota. We encourage clients to consider Heavy Shakes whenever possible. Because they offer substantially more long-term performance for a small increase in cost up front. From the ground most people cannot tell the difference between Medium and heavy Shakes other than a general increased perception of quality because they have more meat. On average, this material ranges from 3/4” to 7/8” thick at the butt end and is installed with 10”courses. Expect to get between 25 and 30 years of service out of an unmaintained Heavy Cedar Shake roof in Minnesota. Approximately 16% of Twin Cities cedar roofs are done in Heavy Hand-Split Shakes.
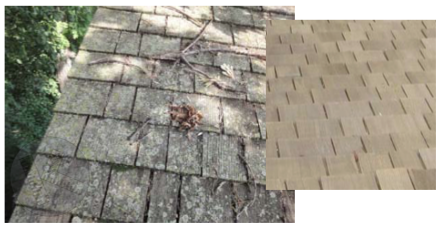
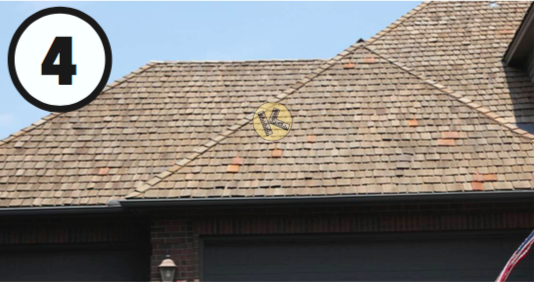
Forget hail damage, animals, moss, rot, ice and wind. The sun is your roof’s main enemy.
If I’ve said it once, I’ve said it a thousand times, the purpose of all of the wood on your roof IS NOT to keep water out of your home. Its’ purpose is to protect the tar paper below, which is the stuff that actually keeps the water from wrecking your ceiling (and your day). As long as the tar paper on your roof stays intact water will stay where it is supposed to be; outside. The roof shown here appeared fine from the ground. In fact, this homeowner received an estimate from a roof washing ‘expert’ that suggested wood cleaning and wood preservation. Bad idea (and bordering on criminal if you ask me).Still, I guess I can see how a novice might think this roof was worth saving. After all, there was no cupping or curling, no missing shakes, no wind or hail damage, no rot caused by organic deterioration, nothing dramatic whatsoever. Upon closer examination I immediately knew it needed to be replaced. Why? Open keyways.
Good from afar but far from good….
Keyways:
The spaces between the shakes are called ‘Keyways’. In some ways they are the achilles heel of your cedar roof system because the shake in the course below is at its’ thinnest point at the top of the keyway. In the roof shown here there are no less than 34 open keyways in just this small area. The cost to replace that many shakes when factored across the entire roof made the concept of roof repairs unwise. The only option for wood roofs with numerous open keyways is replacement. Open keyways are the number one reason cedar roofs fail. Of the thousands of roofs I’ve inspected this problem accounts for at least 90% of the roof failures with the other 10% comprised of organic rot, fastener failure and installation errors.
Classic UV damaged tar paper. Once the roof decking is exposed below, leaks begin.
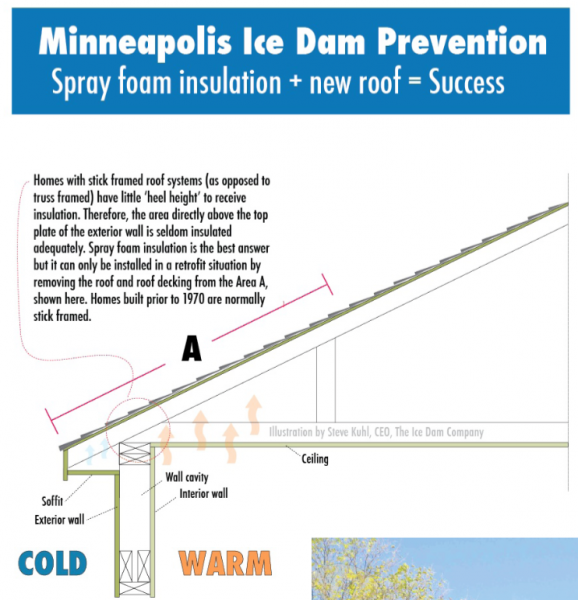
Science + Common Sense + Insulation & Ventilation = No Ice Dams
Frost Melt Patterns
At their most fundamental level, ice dams are the result of the interaction of heat loss and snow on your roof. An experienced Kuhl Thermographer can use photos like these in conjunction with infrared imaging to see the weak points in your homes thermal envelope. If you have a moment on the next frosty morning, take a few photos of your roof from a few angles before the sun hits it. Those photos may end up saving you time and money if you are hoping to x the root cause of ice dams and home heating inefficiencies.
Thoughts from an Honest Roofer on Washing Cedar Shake Roofs, Part One.
Why Equipment Matters:
If your roof is in good enough condition to wash, congratulations. You have the opportunity to add years to its remaining life through occasional maintenance. But it is important to understand that a cedar roof should only be washed using specialized equipment. Standard pressure washers, like the one pictured to the right, will do a good deal of damage to a cedar roof regardless of the user. That damage will most likely not be visible from the ground because it is a matter of hundreds of an inch. In fact, consumer-grade pressure washers will remove between five and eight times the amount of wood from your cedar roof than professional equipment. If you have ever seen a cedar deck that looks furry and splintery after washing you know what we are talking about.
Kuhl only uses high volume, low-pressure equipment
to wash cedar roofs. Our trailer mounted washing
unit is custom built for washing cedar roofs and cost us $25,000, not including Steve’s free labor to weld it all together. There are only a couple of wood restoration firms in the country that use this specialty equipment. Where the standard consumer-grade machine will push 3-4 gallons per minute through the wand, ours pushes 12! This is why we often refer to our process as power rinsing, not power washing.
Why should you care?
Because regular pressure washers–the kind used by painters, handymen and some of our competitors–are an entirely different machine. Such units should never be used on a cedar roof as they operate at inappropriate water volume to pressure ratios, resulting in significant wood loss. (See the photo in the header of this Case Study. Right half shows major wood loss.)
If something like this shows up in your driveway the day your roof is to be cleaned, you’ve hired a pro with the commitment to invest in the right tools for the job. If someone in a minivan shows up, you may want to reconsider.
Companies that don’t invest in industrial equipment do so for
one reason; it is much cheaper to use a cheap machine than an industrial unit. Furthermore from the ground the results look about the same to you. The discoloration on your roof is gone, the roof looks fresh and clean again. But upon close inspection you will see that those machines have removed a lot of wood. Not good. Regardless of the appearance from the ground, using a typical pressure washer on a cedar roof will take years off its existing lifespan even if wood cleaners and/or brighteners are used. Ultimately, wood loss in the keyways is one of the primary reasons your roof will fail in the future.
High volume machinery cleans cedar without damaging it.
Kuhl’s Contracting Six Examples of How the Cheapest Company Costs the Most
After being in business this long we have countless examples of crappy work done by other contractors here in the Twin Cities. Sometimes it’s a matter of inexperience while others it is a question of ethics. Either way, it’s a giant buzz kill to find out the guy you hired a while back pulled a fast one and left you with a bad job. But in defense of good contractors in Minneapolis–and there are many of them–homeowners frequently bear some responsibility in this story because they cared more about low price than other factors. Yes, this is a case study about getting what you pay for.
1. Heat cable job on Edina Country Club home. Cheap cable bought from Home Depot. Spaghetti install method used.
2. Cedar roof washing attempted on roof that should never have been washed. We ended up replacing this roof.
3. Kickout flashing installed on cedar roof in Minnetonka. It was not installed into the stucco and was therefore useless.
4. Cedar roof deemed worthy by our competitor of washing and restoration. Bad idea. We replaced this roof a year later.
5. Roof damage caused by ice dam removal with a hammer and pick in Edina. The valley metal was punctured in many locations. Ouch.
6. Chimney cap repaired via the application of magic goop. This ‘ten year x’ lasted two years. We replaced the chimney crown entirely.
So, what is our point?
You hear it all the time. You get what you pay for. Well, yes and no. We all know it’s possible to pay a lot for crappy work and on rare occasion pay a little for excellent work. Still, it’s generally true that the ‘get-what-you-pay-for’ principle applies to residential contracting here in the Minnesota. If you receive an estimate from our competition that is substantially lower, the odds are they are including lower quality labor or materials, they plan on change-ordering you to death, they have figured out ways to cut corners during the job, or a combination of all the above. It’s normally not the case that the other company has decided to profit less from their work. They run a business, after all.
In the case of Kuhl’s Contracting, what you buy always aligns with what you spend because we jointly agree on your needs up front. Want to perform your work on a tight budget? Not a problem. Concerned mostly about the long-term performance of the work? Not a problem. The work we do for you-and what it costs-will depend on the needs you express while we are estimating your project.
To have someone from Kuhl’s Contracting give you an estimate click here.
How to replace a tasty lead cap with galvanized steel
The Problem:
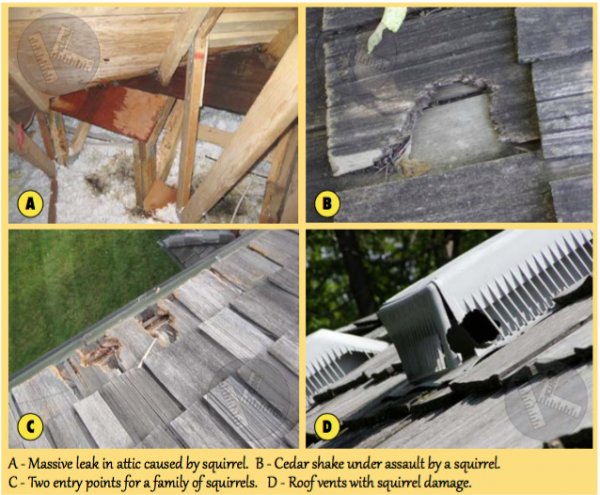
What is it with squirrels and roofs? They can’t seem to keep their teeth off them. We inspect hundreds of cedar roofs in the Twin Cities area each year. Time after time we find the same types of damage. Lead cap plumbing vent ashings such as the one here (A) are common targets of the squirrels zeal for chewing. Lead cap ashings are also commonly used on asphalt, tile and slate roofs with a similar outcome. If you look closely you can see all the teeth marks.
The Solution:
We have resolved this sort of squirrel damage in a few ways. The most obvious solution is to replace the entire lead cap with a new lead cap. This is the easiest solution but the problem is that once your neighborhood critters develop a taste for lead it seems that they just can’t help themselves. They
will contiue to come back and chew cap after cap. We came up with the below solution on one such roof. After being called out three times to x the same leaking ashing we decided to employ a more permanent, albeit expensive, solution.
Five Steps to a Permanent Plumbing Stack Flashing
1. Remove old lead cap assembly.
2. Fit galvanized sheet metal lid.
3. Trim sheet metal to a donut with tabs that are about 3/8” inside the dimention of the inner and outer pipes.
4. Crimp the metal tabs down to grip the stack ashing and dive into the cast iron plumbing stack.
5. Sit back and admire. Oh, but be careful sitting back because you are still on the roof.
List of Common Ice Dam Locations on Minneapolis Homes
June 2nd, 2017
by Steve Kuhl
What is an Ice Dam?
An ice dam is the ridge of ice that forms at the edge of a roof which prevents melting snow from draining as it should. The water that backs up behind the ice dam can leak into the home and cause damage to walls, doors, ceilings, insulation, and other areas. Ice dams usually occur between December 23rd and March 1st in the Minneapolis area.
Top Nine Areas Where Ice Dams Occur on Minneapolis Homes
Ice dams do not occur over unheated areas such as garages and porches.
The valley areas of dormers frequently get ice dams.
Ice dams often occur both below and above skylights. Ice dams above skylights are hard to see from the ground.
Any openings through the roof – such as pipes and vents – are a good place for ice dams to form.
Valleys are very common areas for ice dam formation. It is important to never use hammers or chisels near valleys.
On roofs with a low pitch (angle) even an 1-2″ ice dam can cause significant leaking and interior damage.
The eave edge is the most common place to see ice dams. 80% of the dams we remove are found here.
Interior rooms with vaulted ceilings are frequently associated with large ice dams. Bathrooms are often the worst.
Ice dams occasionally form around chimneys and furnace flues. Any place heat escapes through the roof line.
How to Spot Ice Dams on Homes in Minneapolis and Surrounding Areas
Thoughts on Ice Dams by Steve Kuhl:
Think of it this way. Ice dams normally migrate over time from the the outer most edge of your eave in towards your home.
If you have gutters, the ice dam will form there first and then grow (migrate) back towards your heated space. Icicles on the outer most edge of your eaves are not necessarily a reason for immediate concern. Ice coming through the soffit or soffit vents is no good. Ice coming down the exterior wall is a very bad thing and means the water is most likely in your wall cavity.
Six Common Locations for Ice Dams to Show Their Ugly Face
The edge of your roof.
The gutter. Remember, ice dams as little as one inch thick can cause big problems.
Behind the gutter on the facia.
Through the soffit vents or through the soffit itself. This is bad news.
On the siding or exterior wall surface. This is really bad news.
Inside or around window or door frames. This is really, really bad news.
Often times the most difficult thing in resolving a roof leak is to find it in the first place. Roof leaks in Minneapolis present some extra challenges because of the added influence that snow and ice buildup can play. This case study will examine the most common causes of roof leaks in the warm season.
Common Minneapolis Roof Leaks
Ridge, otherwise known as the peak, is a common place for water infiltration. Look for uplifted or loose ridge material. Animals love chewing through ridge too.
Roof vents, in particular plastic roof vents, are the source of some leaks we investigate. Normally they leak due to damage by storms, animals or poor installation.
Valleys. Roofs almost never leak in the field. Instead they leak where there are breaks in the surface or intersections of roof planes such as valleys.
Plumbing or HVAC vent pipe penetrations leak during both warm and cold seasons. The rubber gasket, called a ‘boot’ often cracks open after 10-12 years after install.
Wind-driven water can work under the rake edge roofing material and show up inside. These leaks usually manifest near the outside gable walls of the home.
Leaks in windows are often thought to be roof leaks because they sometimes show up on the ceiling many feet from the window itself. We always check out windows.
Side wall flashing, also known as step flashing, can leak either due to wind-driven rail or improper installation. The latter is by far the most common.
Bath and kitchen vent hood penetrations leak almost exclusively due to being poorly installed. The water can follow the vent pipe and manifest many feet away.
Dormer flashings connect vertical walls with roofs. If these flashing are not installed behind the siding correctly there will be leaks.
Gutters that are not sloped correctly or full of debris can allow water to back tip into the eave and into the home. This happens winter or summer.
Chimney caps. Water that gets in through the cap of a chimney, in particular a wood or stucco chimney, will often show up inside the home on walls or ceilings.
Water that gets into the siding of wood or stucco chimneys will eventually show up inside the home, usually on the ceiling.
The flue penetration joint through the chimney cap will leak and let water into the home if it is not sealed properly.
The saddle (not shown) is the structure that sheds water away from the top side of the chimney. Saddle problems are very, very common in Minneapolis.
Step flashing along chimneys, in particular masonry chimneys, frequently leak during long, wind-driven rains that force water ‘uphill’ into the chimney.
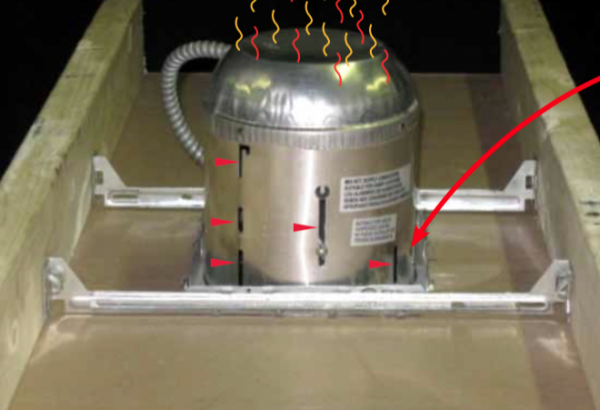
Uncapped furnace flues will allow water directly down the flue, which are not waterproof. This explains the rusty water next to your furnace in the basement.
The storm collar on flues should be caulked. This caulk often fails after about ten years, leaving water an easy way into the home.
The cone flashing around the base of furnace flues will fail on rare occasion. It’s more common for leaks in this area to be due to bad installation of the flashing.
Kick Out Flashing Contractor Gives Advice on Right Versus Wrong
The Problem:
Undoubtedly installing kick out flashings here in the Twin Cities isn’t always as easy as it looks. It’s just a simple piece of sheet metal, after all. To the misfortune of many area homeowners, their contractors, handy-guys and husbands frequently underestimate the complexity of these small projects resulting in some serious problems. The work shown here (A) is a perfect example of how good enough won’t cut it when it comes to installing kick out flashings into stucco. Not seen is the rotten stucco wall directly below this new flashing work. This homeowner’s handyman installed aluminum flashings under the cedar shake roofing (good) but installed the flashings against the stucco wall (bad). Undeniably kick out flashings need to be installed behind siding materials. No exceptions.
The Solution:
We installed two separate kick out flashings in this stucco wall; one at the base of the valley (B) and one at the lower edge of the roof (C). To do this we removed the area of stucco indicated by the dashed line (D). Installing kick outs in existing stucco walls is challenging mostly in that getting the best match of color and texture possible is sometimes a real pain. Can you see the patch in this area?
The new kick out flashing was installed under the existing valley flashing and behind the new stucco patch.
For example you have just had your home inspected and someone says you need kickout flashings. With this in mind what exactly is a kickout flashing and what does it do?
Kickout flashings: Required by Minnesota Building Code, the purpose of a kickout flashing is to direct water off your roof and away from the exterior wall of your home. Depending on your siding and the construction of your home, installing kickout flashings ranges from quite simple to a bit of a challenge. A correctly installed kickout flashing will be installed under the roofing and behind the siding and may require more than one tradesman (as in the case of stucco homes, for example).
Samples of kickout flashings. Top, a kickout flashing installed in a cedar shingle sidewall. Below, a kickout installed in a stucco wall. Notice that one drains into a gutter and the other doesn’t. Both are common in Minneapolis homes.
Here is a sample of a kickout flashing installed into an existing stucco wall. Also this is under a new cedar shake roof in Minnetonka, Minnesota. It is possible to use a ultrasonic saw to carefully kerf into an existing stucco wall in a way that allows one to insert a kickout flashing under certain circumstances. From time to time we may need to remove stucco and patch the area after the kickout is installed.
The Addition of Flashing to the Edge of This Roof Saved This Lake Harriet Homeowner Serious Money
The original builder of this beautiful home near Lake Harriet in Minneapolis spared no expense when it came to quality in design and materials. But nobody is perfect. The original roofer installed the cedar shingles with an inadequate drip, or overhang, from the large crown moulding on the top of this bay window (A).
As a result, water quietly leaked behind the crown and into the wall of the bay window, causing a fair amount of rot and damage to the wood casement windows (B).
Our client had received one opinion from the original builder to x the issue. Because the home was 12 years old the x was not covered under any warranties and it wasn’t going to be cheap. His idea was to replace the cedar roof, crown moulding, windows and surrounding trim. Cost: $5355.00.
Ouch.
In our opinion there was a smarter (and cheaper) way to fix this area that would last many, many years. First, to solve the issues related to the inadequate cedar roof projection we simply fabricated and installed a custom ashing under the first course of roofing and tar paper. Pow! Next, we dug out all of the soft wood and used an epoxy wood hardener to stabilize all of the areas affected by the water over time. Finally, we filled all the damaged areas with a two-part epoxy putty. After sanding it all down and painting, the place looked like new. It still does three years later.
Stucco Home in Eden Prairie Has Damage That Needed Fixing
The Problem:A leaking stucco chimney. The cap of the original chimney had a sloped mortar core with a top coat of stucco (portland cement). Bad idea. We don’t like stucco to be used on horizontal surfaces unless particular steps are taken. Water was leaking down into the chimney column and causing trouble below. Instead of rebuilding the upper portion of the chimney (big bucks) we advised our client to cover the existing cap with a custom copper chimney cap.
The Solution:Many Kuhl solutions, such as this one, are based on a rendering produced specifically for each job. We would rather work out the details on the laptop than at your home as the work is underway. Plus, renderings allow us to have a conversation about design possibilites before any work begins. The copper chimney cap we built for this home cost roughly $1,200 to fabricate and install. It is a superior quality finished product that will stand the test of time and changing of seasons. What leaking stucco chimney?
This is an impact mark from a .75” hail stone on a 3 year old medium hand-split cedar shake roof in Edina, Minnesota. Such hail frequently causes severe damage to cedar shake and shingle roofs. In this case the wood was resilient enough to escape with only a minor ding. Neighbors all around this home had their roofs replaced from the same hail storm. This roof sustained only cosmetic damage.
Here we see a 13 year old hand-split heavy cedar shake roof with heavy black mold and oxcidation. The direction of the hail storm resulted in glancing blows rather than perpendicular strikes. The discoloration on the surface of the cedar shake has been removed by the impact of the hail stone but no functional damaged was done that will affect the integrity of the shake.
Hail storms in Minneapolis are all quite unique and localized. One neighborhood can be hit hard while the next one over barely gets hit at all. Pictured here is a 15 year old cedar shake roof in Plymouth, Minnesota after a severe hail storm. Not only was the hail .75” in diameter, it was very concentrated. While this particular cedar shake is more or less new many repairs were needed on this roof in other areas.
This cedar roof was 22 years old and was victim of a hail storm that went through Maple Grove a few years ago. The entire roof was littered with debris from the storm. There are a few interesting things to note: First notice how the cedar that was exposed as the result of the hail damage looks ‘fresh’, with orange coloring while the surrounding material is grey and weathered. Next, the hail damage is most severe on the butt edges of the shakes.
3/4” to 1” hail really whacked this poor roof on Lake of the Isles in Minneapolis. The material was 22 years old and was somewhat brittle prior to the hail storm. This enhanced the affect of every hail stone impact by allowing deeper penetration. Even if this roof were 5 years old at the time of this event it would have hail damage. The reason being that it is less brittle at 5 years old than 22 years old. The damage seen on older cedar shake roofs, such as this one, are in direct proportion to the degree of existing embrittlement. For example, it was relatively easy to roll my thumb off the bottom edge of these shakes and produce 1/2” to 1” of crumbled cedar dust. Our clients had this roof insured through Chubb, which I have found to be the most generous and fair insurance companies to deal with in storm damage cases.
This is the same cedar shake roof on Lake of the Isles, Minneapolis. It’s common to see different hail damage from one roof slope to the next. There are two reasons for this. The first reason is that hail storms normally throw hail from a dominant direction and the force of the hail impact is increased as the strike angle becomes more perpendicular (as opposed to glancing strikes). All of the south facing slopes can be trashed while the north facing areas are barely affected, for example. The second reason is that the orientation of a roof will affect how the wood ages significantly. Northern slopes tend to maintain hardness and integrity longer than south-facing slopes. Other factors such as tree coverage, roof pitch (steepness) and maintenance history factor in as well.
No matter how long winter is, spring is sure to come. And if you’ve been around the Twin Cities last week, it feels like it’s already here. It’s hard to imagine it’s still February, but it’s never too early to start thinking about your home maintenance needs.
If you live in Minneapolis, we want to make sure roof and gutter cleaning are on your list this year. If it isn’t, we’re here to tell you it should be! During the winter months, harsh weather affects the integrity of the health of your home. Ice, snow and dramatic temperature shifts can all wreak havoc on a roof. Even if you don’t suspect any problems or issues, it is best to scope it out just to be certain.
Many Minneapolis homeowners forget about their home exteriors over the winter months so we thought we would put a simple checklist together to help with the broad strokes.
Minneapolis Roof and Gutter Maintenance Checklist
Safety first
Walk around and inspect from the ground level first
Ladder safety: Be very careful on ladders
Roof safety: Under most circumstances we do not recommend homeowners climbing their roofs. It’s best to hire a pro
Clear off big debris
Use a bristle broom or leaf blower
Cleaning gutters
Hands-in for big debris
Hose for small stuff after. A hose rinse before cleaning big debris can clog the downspout
No pressure washers as these machines can damage the gutters
Dealing with these budding problems in a sensible timeline will help your roof withstand the spring rain, hot summer sun, and any additional challenges that come with the changing of the seasons. If you determine you need a professional for roof cleaning or need roof repairs, call on Kuhl’s Contracting to do the job.
Minneapolis Homeowner Struggled to Find Educated Perspective on Ice Dam Mystery
The Problem:
Our client had been plagued by ice dams and cold-room-syndrome for many years. Ice dams are a roof problem, so why not call a roofer? The fact is, ice dams are not a roof problem and while one can limit the damage done by ice dams through intelligent roof design and installation, ice dams are a part of a bigger system involving the way heat and air move through a home. Simply replacing this roof would not prevent ice dams from happening in the future. Need a problem solved right? Call Kuhl.
The Solution:
The solution to just about any problem involves first understanding the underlying causes. Ice dams are the result of a complex interaction of many things including architecture, climate and lifestyle. To put a finer point on it, ice dams are related to how heat escapes from the areas it belongs to areas it is not supposed to be. That heat causes snow melt on your roof, and the saga begins.
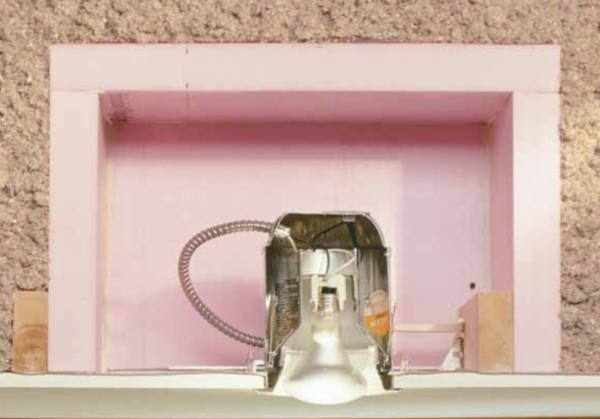
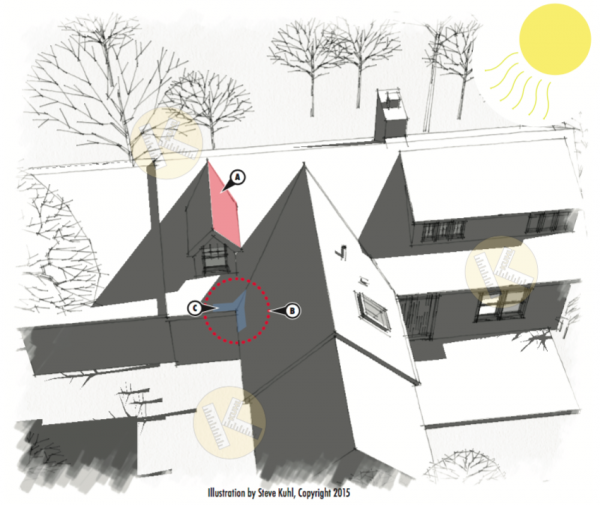
We used our thermal imager to study the heat loss in this home (A). The result was clear: we needed high performance insulation and it had to be in a small cavity. That’s a perfect time for spray foam insulation (B). At R 6.8 per inch, it packs a real punch in a small area. We removed the plaster and sprayed foam insulation in the exposed roof areas to create a hot roof (a roof that needs no ventilation). After insulating the knee wall spaces and replacing the roof area above with a full treatment of ice and water shield, we installed new plaster and repainted.
The result was clear: we needed high performance insulation and it had to be in a small cavity. That’s a perfect time for spray foam insulation (B).
There are few companies in Minnesota that can diagnose and resolve small, multi-trade home improvement projects with the efficiency and cost effectiveness of Kuhl. Not to brag, but we are pretty awesome.
Our clients, homeowners in Eden Prairie, had a mysterious water spot on the ceiling of their dining room. It clearly was related to rain because there was no plumbing in the vicinity and the damage appeared after one of those long, soaking storms. Their original builder offered to come out and take a look and he found what he thought was the problem in a few minutes, that the leak was originating around one of two roof vents near the peak of the roof (1 and 2 in below photo). We were asked to render our opinion the next day. The problem was easy to find and it had nothing to do with the vents.
The builder made a common mistake: he flipped the lights on in the attic so he could do the best inspection possible. Seems logical enough. But we have learned it is always smart to take some time in the dark up there to see things otherwise hidden. In this case, the hidden thing was a small hole chewed in the roof between the two vents (f’ing squirrels!). A visual inspection of the roof confirmed this assessment. Dork alert: We took this excellent photo of the hole by holding our camera against a framing member on leaving the shutter open for a long exposure. Not that we are geeks about this sort of thing. But seriously, how cool is that photo?
The Solution:
The solution was a rather cheap repair to the ridge of this medium hand-split cedar shake roof. Now, keeping the squirrels off the roof is another matter altogether.
Cedar Roof Cleaning Expert Rescues Excelsior Homeowner from Other ‘Expert’
The Backstory:
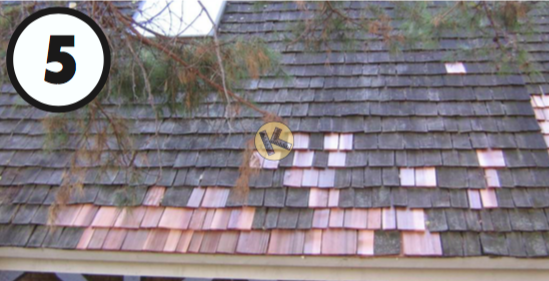
Upon the advice of her realtor, our client hired a roof washing franchise to wash her cedar shake roof. She was about to put her house on the market and a moss-free roof would be a nice touch. The company she hired specialized in cedar roof cleaning so it was a perfect match. Problem is, because these guys earn all their money washing roofs, they tend to think every roof is worth washing. And while they were 85% correct in this case, the 15% that wasn’t worth washing got ugly, quick (See below image: 1). The moment these guys started washing they must have realized the error of their ways so they did their best to take off the biggest chunks of moss while not trashing the roof. The outcome was not pretty.
She fired them shortly after they wrecked the garage roof. Her builder suggested using Kuhl as a resource to wash (hopefully) the rest of her roof and fix the cedar roof on the garage.
The Outcome:
Our professional, on-staff roofers replaced the garage before we washed, repaired and preserved the remaining roof areas.
We replaced the garage roof with a hand-split shake to match the remaining roof. We then used a larger orifice tip in our washers to reduce the pressure delivered onto the remaining roof areas. Adjusting pressure and volume settings is something we do frequently to accommodate every roof, because they are all different. We also tell clients when washing some or all of their cedar roof is a bad idea, regardless of the impact on our bottom line. In the long run it’s really smart business.
Before and after cedar roof cleaning, repairing and preservation. This roof was 17 years old.
We’ve seen this over and over on Twin Cities’ homes, in particular homes built in the last 30 years in Eden Prairie, Minnetonka, Edina, Plymouth, Wayzata, and Bloomington. A bottleneck created by the intersection of the garage roof and the wall of the home. The result is a pinch point where water frequently leaks into the walls below. Normally this type of leak takes years to manifest inside the home, resulting in a fair amount of interior repair work once it is discovered. Bummer.
Common trouble spot. In concept, this detail is okay but it is seldom executed well. Whether you blame it on the architect or the builder, someone didn’t spend enough time thinking about water when this area was conceived.
Project rendering of area before work began. The challenge was not to turn this into a major project because it involved roofing, siding, sheet metal and masonry.
We removed the area indicated by the red outline.
This is a common problem found on many homes regardless of the siding type. In this case, the brick veneer only amplified the issue by trapping water and debris efficiently with each rain. The leak damaged drywall and insulation inside the home.
The Solution:
We removed the cedar lap siding and shake roofing so we could expose and repair the rotten roof decking. After wrapping high-temperature ice and water membrane from the roof up the walls we then installed a hand-soldered galvanized steel pan, a bomb-proof solution to a problem two other companies had tried to address over the past ten years. The new metal was ground into the brickwork and counter flashed for total awesomeness (Industry term).
This is one of those troublesome small projects that no one wants to touch. An expert solution involves at least five trades and pays each one very little for their contribution. It falls into the ‘not worth the trip’ category for a lot of contractors as a result.
We happen to employ masons, carpenters, roofers and sheet metal guys so a project like this is right up our alley. Plus, when we kick ass on a small job like this people tend to recommend us to others. That makes us happy.
Gutter Contractor Installed $32,000 of Worthless Copper Gutters… Then Laughed All The Way To The Bank
The Problem:
Our client had gone ten rounds with the company that installed this gutter debris management system (A). Next stop, lawyers and courts. They decided to cut their losses and hire Kuhl to replace all of their gutters. The first step in resolving problems with an existing system is to understand the nature of the problem. Here is how we explain things to clients (B).
The Solution:
We installed 6” half-round copper gutters on the entire home after ripping off the system that was in place. Our gutter system was conceived carefully to achieve three goals:
Capture water running off the roof.
Last a long, long time.
Look great.
We work with a variety of materials and products because we don’t like being married to one method. The company that installed the original system on this home sold one system and simply could not resist the temptation of a huge job, even though their system was not correct for this home.
This is the community building owned by an exclusive neighborhood association in Orono. For years different roofers were hired to address the leaking chimney (A), only to ultimately fail in their attempts. Their answer, caulk and tar (B). Here is the pesky leak as seen from the mechanical room of the building (C).
The Solution:
We installed a new 24” medium hand-split cedar shake roof (D) and a custom copper box riglet flashing (E) around the perimeter of the chimney. This required a deep kerf cut into the field stone and a few little adjustments to the roof decking around the chimney. Our roofing crew established the smallest box riglet dimensions by drawing plumb lines down from the maximum overhang of each field stone on each side of the chimney. The step tins were installed along those lines as each course of new cedar shakes was installed. Finally, we returned to saw in the top half of the box riglet.
Remodeling a Bumpout Window With a Bad Leak in Minnetonka
The Problem:
Imagine you have a window bumpout like the one here (below). The builder was running a little thin on his margin so he skimped on a few details. Now 13 years later, you have rotten siding, soggy millwork, and a roof that leaks. Now imagine that for the first time you looked at this feature on the front of your beautiful home and realized not only that it was rotten, but it was ugly too. You could find a roofer to fix the metal roof and then a carpenter to rebuild the bumpout. Or, you could call Kuhl to do it all and redesign a few key elements in the process to add a little more class to your home.
Things That Make Us Cringe Upon Inspection:
Missing z-flashing above window.
Thin gauge steel roof, rusted through and poorly installed.
Gutters terminated too close to wood resulting in big time rotting.
The overall design felt utilitarian and ‘builder-grade’.
Rotten 1×2’s arranged in a quasi-sunburst pattern.
Steel roof installed short from facia (= more rotting issues).
No kickout flashing (code required, and smart besides.)
Totally rotten panels. And, how hard would it have been to add one more vertical stile to carry the lines of the window mullions through visually? Answer, not hard. It just requires some design experience.
One Edina Man’s Story of Dealing with Storm Chasers and His Cedar Shake Roof
The Problem:
Jerry’s roof was replaced by some storm chasers after a hail storm in 2006. His insurance company agreed to replace the skylight units (1) but refused to pay for the replacement of the curbs and curb flashing (2) because “they were not dented by the hail”. So poor Jerry had new skylights installed on top of old, crusty curbs. It wasn’t long before they started leaking. He chased the insurance company and the roofing company, who both successfully pointed the finger at the other. Sorry Jerry. You lose.
The Solution:
There are two parts to this solution. First, before agreeing to any settlement with his insurance company, Jerry should have called Kuhl to sniff around and examine the claim. We would not have allowed them deny the curb replacements. Period. We have some experienced former adjusters on staff who know all of the games insurance companies play. They don’t miss a thing.
Would have, should have, could have. The fact was that Jerry was left holding the bag and someone had to fix these skylights. That’s when he called us. We removed the skylights and bad curb flashings then fabricated a custom copper flashing to accommodate the existing roof flashing and the existing non-standard curbs. After we fabbed up the flashings it was a simple matter of soldering it all together and repairing the roof around each unit.
Cedar Roof Cleaning Franchise Perpetrates Another Bad Roof Renew Job in Orono
The Problem:
We lose a hand-full of cedar roof restoration jobs each season to a competitor that likes to include “50 or so” shake replacements in their bid, regardless of the roofs age or condition. It’s extra frustrating when we are called back to inspect the work they did because it ‘feels incomplete’ to the homeowner. Almost without exception we find unaddressed issues with this company’s work. Here is one roof in Orono we inspected in August of 2011 that had just been ‘renewed’ by another company. It was still drying out from the washing when we arrived the next day. We won’t mention names, but it was a company that specializes in washing roofs and does a lot of advertising to fill their schedule. Clearly they don’t specialize in repairs. Oh snap!
Cracked passive roof vent – needs replacement.
Damaged boot flashing – needs to be replaced.
Crushed Type-B flue cap – serious issue and potentially dangerous – may cause carbon monoxide to reach toxic levels in the home.
Open keyway between two shakes – this is an example of a shake that should have been replaced during the roof renewing process.
Here’s the skinny on cedar roof repairs. If you want to limit what you spend, make sure the person doing the repairs addresses the most severe areas first. You should have an understanding after the repairs have been performed as to what work was left undone, if any. This client needed another $1,512 in repairs to complete the job.
List of Issues Left Unaddressed After Repairs Were Completed:
No problems here. The ridge pieces were installed properly.
Missing shake – needs a replacement.
Open keyway – 1 of 11 such oversights on this roof area alone.
Crack in the shake aligns with keyway in the course above.
Shake installed upside down.
Code requires minimum shake of 2″. This doesn’t meet code.
Maximum keyway spacing allowed by code has been exceeded.
Clients Chimneys Were Leaking, But at Least They Were Super Ugly
The Problem:
Our Eden Prairie homeowner needed a new cedar shake roof and two chimneys rebuilt. More than a simple chimney rebuild, these babies needed a redesign (thank you 1970’s). The 12” thick lump of concrete originally installed on top just wasn’t going to cut it anymore (A). Yes, they were not good looking, but worse, they allowed water to soak into the stone and into the home because there was not an adequate ‘drip’ (B), which is an overhang to encourage water to miss the walls of the chimney. Replacing the concrete washcaps alone would not have addressed the utilitarian character of these chimneys either. They needed some design (C) help and a team of craftsmen to pull it all together. Enter Kuhl.
The Solution:
After forming and pouring the new chimney caps (D) we designed and installed the copper chimney shrouds (E). Each chimney shroud accommodates the exact dimensions of the cap beneath as well as the different flue penetrations. We wrapped the copper up and into each clay flue to keep water out of the system completely (F). The resulting chimney treatments look phenomenal from the curb and will keep the home free of leaks for years to come.
Roofing Contractor Uses Designers and Carpenters to Help Wayzata Commercial Roofing Client
The Problem:
We had worked on Craig’s residence a few times over the past fifteen years. He invited us to give him a bid on one of his commercial properties. It had a tired cedar shingle roof with dated treatments around each window. He wanted to make the building feel ‘more commercially’ and less pseudo 70’s Colonial. For us it was a simple project involving a few of our guys. He hired us to avoid the design and management headaches of trying to do all of the coordination himself.
Things to fix:
Dirty white paint on stepped soffits.
24 yearly cedar shingle roof.
Dated ‘eyebrow’ around each window.
Giant, antiquated light fixtures.
The Plan:
Our designers devised a relative simple and cost effective solution using Hardie panel, plywood and some basic framing. To make sure it was exactly what Craig wanted, we drew it up in detail for his review. We do that frequently.
The Result:
There isn’t another roofing or siding company in the Twin Cities that can match our capabilities from design to specifications to execution.
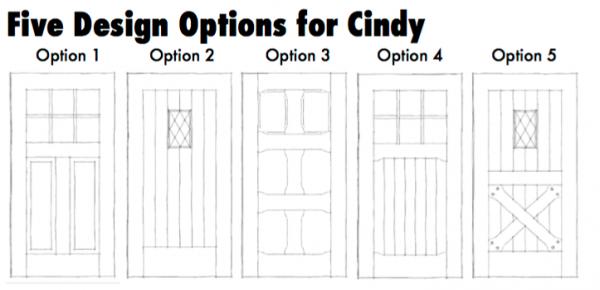
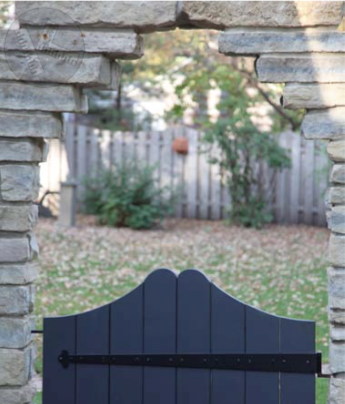
Amazing Deephaven Home with Ugly Front Door Gets a Custom Door from Contractor
The Problem: You have a really nice home with a really crappy front door. That’s no way to welcome your guests.
The History: We first met Cindy in 1998, when we washed, repaired, and preserved her cedar shake roof in Deephaven. We’ve continued to work for her until today, doing a variety of projects including installing a new cedar roof, copper gutters, custom cabinetry, painting and masonry. Cindy is the embodiment of what we look to have with everyone we meet. When her new cedar roof needs cleaning and sealing years from now we will be right there.
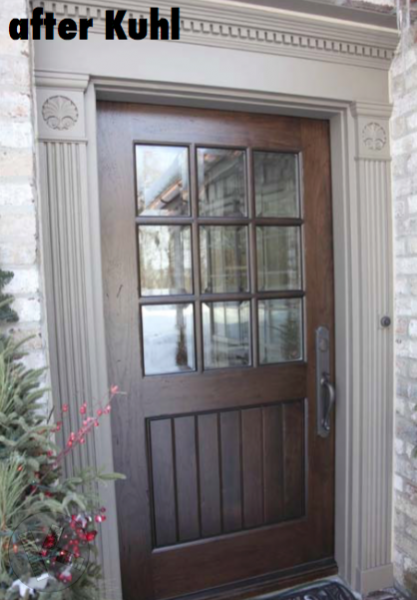
The Plan: Our client, Cindy, approached us about making a custom black walnut front door because nothing in a catalog was going to cut it. We came up with 5 designs that were appropriate for the style of her home. We ended building a hybrid of a few of them. The finished door was 42” wide and weighed almost 175 pounds. In addition to the bad door with no glass for natural light, the existing door frame needed meticulous restoration, like paint stripper and toothpicks restoration. We removed the door frame and restored it in our shop before reinstalling.
The Result:
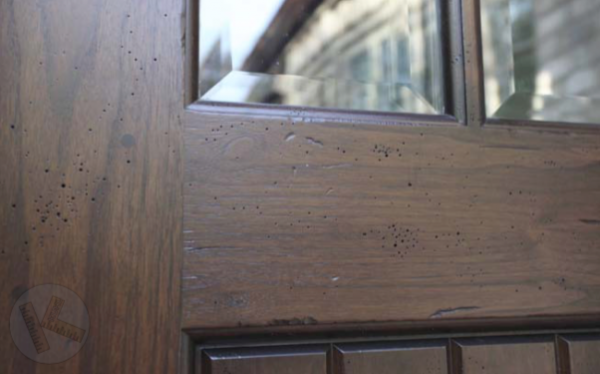
Door specifications: 2.5” thick black American walnut, double beveled insulated true divided lights, mortise and tenon construction with locking dowels. Worm holed, distressed finish. Rocky Mountain Hardware handle set.
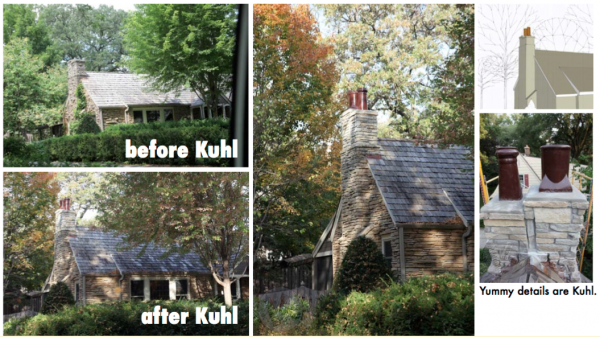
Repair Your Chimney or Enhance the Look of Your Exterior
The Problem
Your chimney is failing, it looks like this, and someone wants $3,200 to fix it. Ouch.
The Solution
Hire someone with experienced designers on staff who know the difference between concepts like Cotswold and Tudor. It would have been easy enough to simply fix this chimney; we do that all the time. But we really like making homes look better so we floated the idea of some glazed chimney pots. It turns out that our estimate for all of the work was $107.00 higher than the other bid our clients received. And their proposal didn’t include killer chimney pots.
Creative Remodeling Contractor Finds Solution to Odd Problem
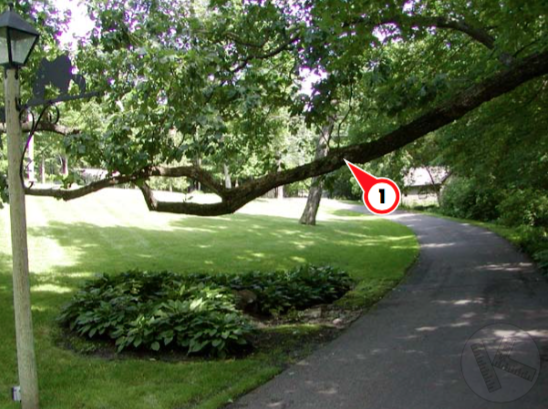
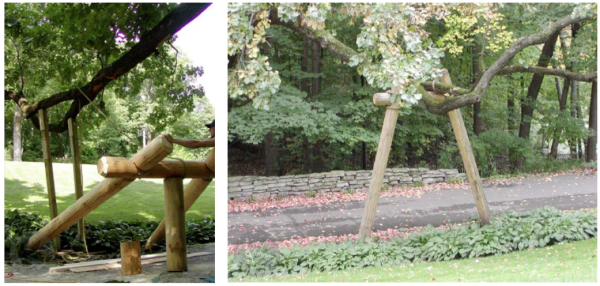
The Problem:
A cedar roof restoration client of ours had an old oak tree that added tremendous character to her property. The problem was that over years the heavy limb (right) sank lower and lower and our client kept buying higher and higher vehicles. She couldn’t stand the idea of chopping the limb off, (or of driving a Ford Fiesta) so it was time to build a limb crutch. We theorized that whatever we built needed to be somewhat dynamic in that it needed to allow for the movement of the tree in the wind.
(1) Car whacking point
Our clients have learned that we shy away from nothing when it comes to solving problems. So she called.
The Solution:
We tracked down some hand hewn timbers from a log supplier near Ely, Minnesota. The shipping unfortunately cost more than the logs so we paid one of our guys for a little road trip. When he brought the goods back to the workshop we realized that they were a bit massive for conventional tools. We notched them out with a chain saw, roped and bolted them together and presto! We had made the first and most likely last tree crutch of our careers. We calculated that the limb weighed somewhere between 1500 and 2000 lbs so it had to be strong. Another challenge was that we couldn’t nail or screw the crutch to the tree because that wouldn’t allow for natural movement through the seasons. After we were done we achieved a 10 foot clearance under the lowest point on the branch. Seven years later the tree and the client are still peacefully coexisting. Got a problem? Just Kuhl it.
Scientific Name – Sciurus Vulgaris
Unscientific Name – Bastardus Rodentae
Size – Body length of about 4 inchs (not including tail)
Diet – Nuts, acorns, seeds, and your cedar roof
Preferred habitat – Mainly a tree dweller, occasionally a roof dweller
This guy popped out from inside the roof vent when Steve was inspecting a wood roof in Shorewood, Minnesota. Squirrels frequently chew into wood roofs causing damage ranging from minor cosmetics to major leaks and house fires. In fact, fire inspectors estimate that each year in the United States over 12,000 house fires are caused by squirrels chewing into wires – Nuts! Whether it’s a roof leak or a potential fire, it’s safe to say that keeping squirrels out of your attic is a good idea.
Still not convinced it’s wise to keep squirrels out of your attic? Here are a few other reasons:
Their holes provide access to other critters like bats, birds, mice and bees.
When-not if-they breed your problems are multiplied by 4 or 5 times.
Squirrels bring fleas, ticks, and mites into your house, which can spread to your living areas.
Aside from fires, they can cause real property damage to anything they come across.
Rodent infestations can cause home sellers a real headache when putting their homes up for sale.
Although rare, squirrels can and do infect people with rabies.
The Solution:
Sorry folks. There is no known way to squirrel-proof the average American home. We suggest a few common sense approaches to minimizing the likelihood that your home will attract squirrels:
Keep trees trimmed back from your home a minimum of five to ten feet.
Sadly, stop feeding birds and other wildlife, as that same food attracts squirrels.
Address new entrances as soon as you notice them. Don’t wait for your home to become familiar.
Treat areas on your home with commercial squirrel repellants (available online).
Edina Homeowner Needed Help With This Unusual Handyman Project
The Problem:
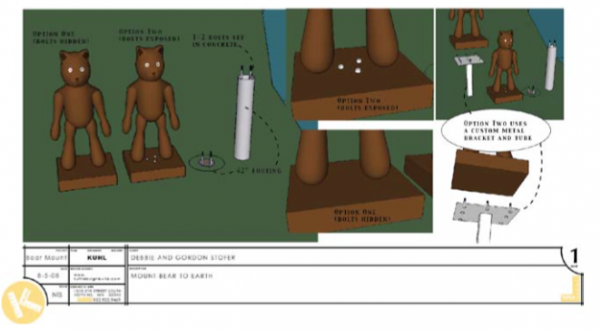
You live on Minnehaha Creek and have this great idea. “I’m going to buy a 400 pound wooden bear”. And then your spouse finds out. Best to get it securely installed so you can start harvesting the praise you’ll need to defend your decision. But who do you call to mount a bear? Yep. You guessed it. You call the guys who have never done it before but who will do just about anything for you (short of actually mounting a real bear).
The Plan:
The Solution:
We gave our client two options. One involved fabricating a custom steel armature, affixing the bear to the steel top plate and then sinking the armature in a concrete footing. Super secure. The second, less expensive and slightly less secure option was to pour a footing with some embedded 12” threaded rods to which we would fasten the bear. Our client picked the second option. He later referred us to his neighbor who needed some work on her cedar roof. Mission accomplished.
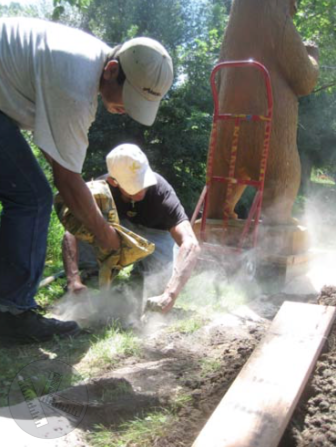
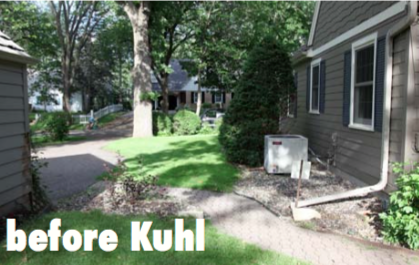
Woman in Hopkins Needs a Simple Stone Wall With Custom Features
The Problem:
You’ve dreamed of a charming stone wall between your home and garage for years. You called a mason but he wouldn’t touch the little spot of rotten siding on the garage where the wall would sit near. He also doesn’t have a guy to make your custom steel strap hinges for the thick custom wood door (that he also wouldn’t touch). Oh, and even though he is a master mason that can stone his way out of any situation, he can’t design for beans, so you need to find someone who understands how all of this can come together. Ideally, you should call someone who has a dedicated team of people who know how to work together. It’s time to Kuhl it.
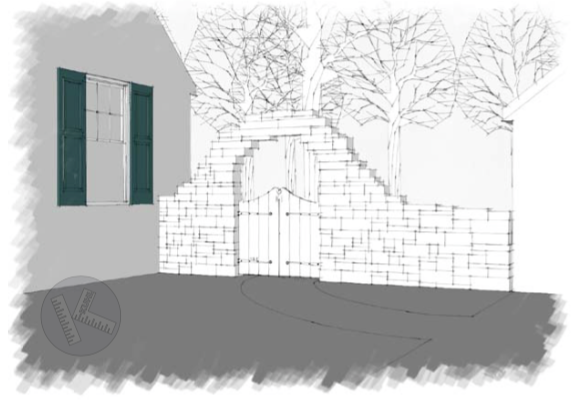
The Plan:
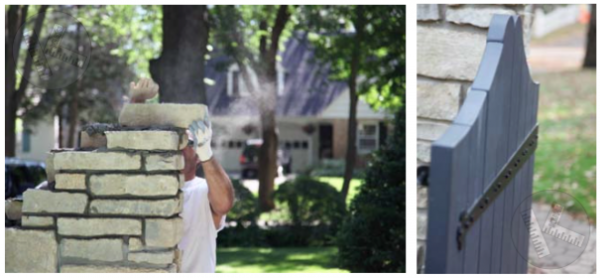
The Solution:
‘Simple’ stone wall trade summary: Stone mason, carpenter, iron worker, painter and designer.
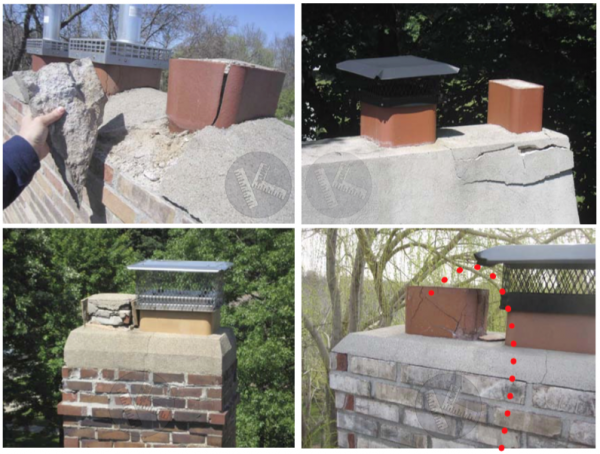
Minneapolis Chimneys Need Caps No Matter What…Here’s Why.
The Problem:
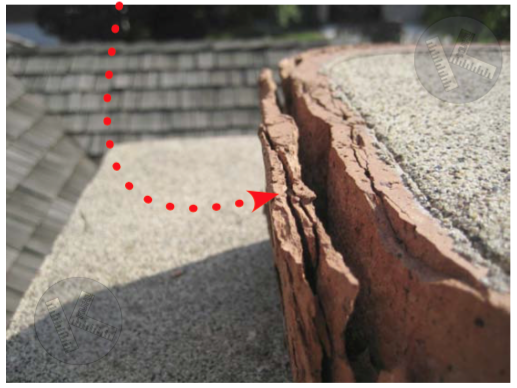
Is Mother Nature giving your chimney a frost wedgie? We’ve seen it hundreds of times around the Minneapolis-St. Paul area. A masonry chimney with one damaged clay flue and one pristine flue. Most people might assume that the flue that gets used frequently might fail sooner than the unused one. Or, that the one that is open to the weather is more likely to fail than one filled with concrete. Neither is true. In fact, the number one determining factor in hastening the demise of a clay flue liner is whether or not it has a cap. By ‘cap’ we mean anything that protects the top edge of the clay liner from the elements.
When water freezes it expands with incredible force. An exposed edge of clay flue liner, as seen here, is relatively vulnerable to this damaging cycle. After this process destroys your flue, it keeps working its way down into the body of your chimney. That’s when things get really expensive to fix.
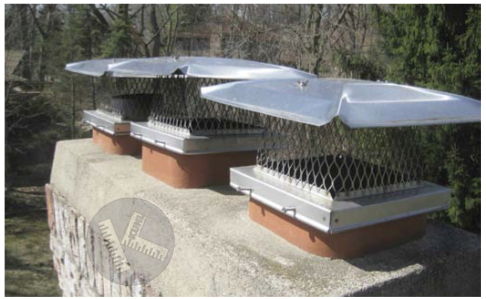
The Solution:
The solution is pretty simple. Cap all clay flues. Concrete fill, as in the case with many passive, or ‘dummie’ flues will not protect your ue from our wicked freeze-thaw cycles.
Installing the typical steel chimney cap, such as the ones shown here, ranges from $125-350 per location depending on flue size and height off the ground.
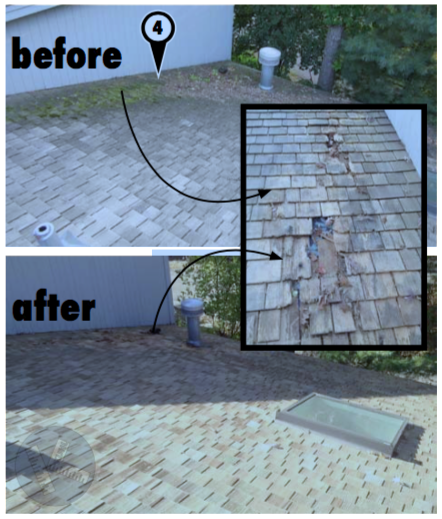
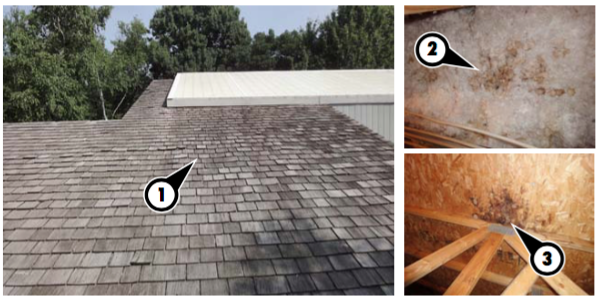
Minnetonka Homeowner Hears the Truth from Roof Cleaning Contractor with Integrity
The Backstory:
It’s not considered bad-mouthing your competition when you don’t name names, right? We were the third company to review this 13 year old cedar shingle roof and provide a cedar cleaning and sealing estimate. By the time I arrived, the client was understandably weary. So far, two companies, two opinions. And now here comes this guy wearing crocks with a big yellow dog in his car. The client had made it pretty clear that if I wasn’t the low bid he was going to go with the second bidder because ‘the guy was nice’. “Dang”, I thought. “I hate competing against nice guys”.
The Problem:
During the roof inspection I noticed a subtle soft spot in the roof deck at location (1). I asked to climb up in the attic. I immediately saw the result of an ongoing roof leak (2) and (3) that had been doing bad things quietly above the vapor barrier for some time.
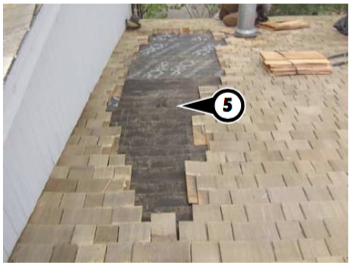
I also noted that while the majority of the roof was worth restoring, one section would require replacing after we washed the roof (4). “The nice guy said he’d include 55 shingles in his bid and that’s all my roof needs”, he said. “Fair enough”, I replied, “But this area alone will require about 120 pieces so I’ll have to respectfully disagree” (5). Fifty-Five cedar shingle replacements would have left this roof in pretty lousy condition, not that the client would ever know. I stuck to my guns and told him exactly what he didn’t want to hear. This was a bigger project than he anticipated.
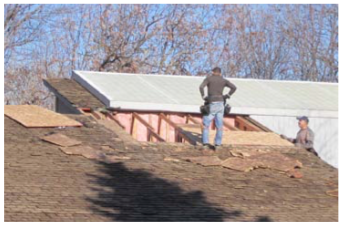
The Solution:
We washed, repaired and preserved this entire roof. We diagnosed and remedied an issue with the skylight flashing that the nice guy didn’t have the experience to find (or integrity to mention). Our estimate for this work was roughly twice what the nice guy’s bid but this job was done right.
How to Keep Birds, Bats, Mice and Squirrels Out of Your Home
The Problem:
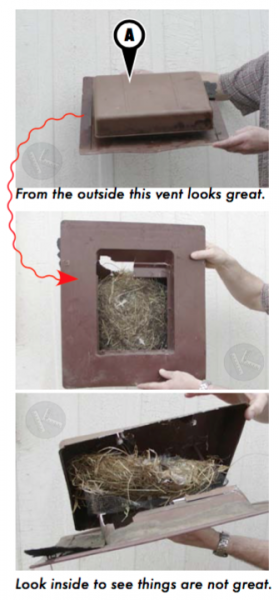
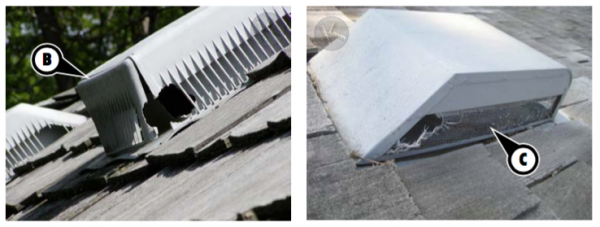
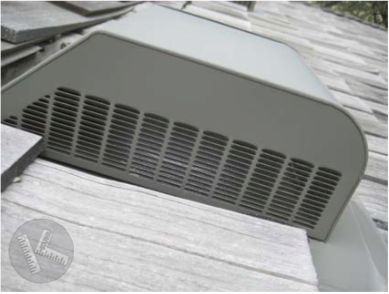
If you have lousy roof vents, don’t feed bad. About 60% of the roofs in Minneapolis that we inspect do. There are three common types of crappy roof vents in Minnesota:
Plastic turtle-style (A)
Plastic louvered (B)
Non-louvered metal vents (C)
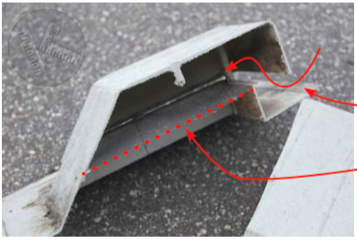
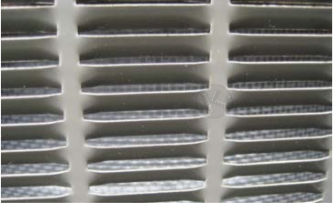
We took a typical plastic roof vent to a band saw and sliced it in half. (Yes, we are geeks). Here are the fatal flaws that exposed within:
Design allows animals to crawl under the hood and onto the screen where they either nest or enter the home.
Layer of screen is made of lightweight aluminum. Animals chew through it was ease.
The Solution:
The solution to animals getting into an attic through cheesy roof vents is to replace them all with metal, louvered vents. Most homes have an average of 9-14 vents on the roof. Even if only one or two of you existing vents have critter problems you must replace every vent on the roof if you want to solve the problem.
How Using a Roof Rake Can Make Ice Dam Problems Much, Much Worse
The Problem:
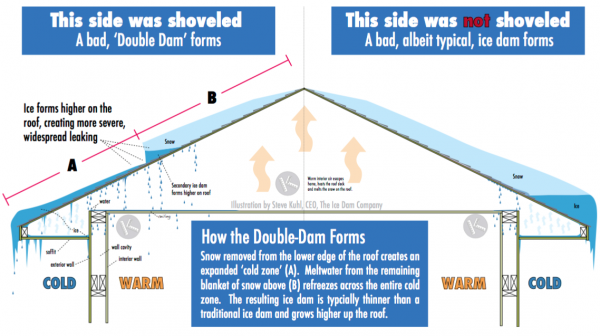
You learned your lesson in the winter of 2011 with the epic ice dam outbreak that hit Minnesota. You read up that removing snow from your roof will prevent ice dams. Ice dams get their fuel (i.e., water) from the snow on your roof after all. Remove the snow, remove the problem. So this winter you buy a roof rake, brave the cold and remove as much snow from your roof as you can leaving a small section of snow still in place higher on the roof that you couldn’t reach. A few weeks pass and bam! You see water leaking through your ceiling and it is even worse than the winter of 2011. How can this be? The answer lies in a phenomenon we call the ‘double dam’, something we have seen over a hundred times in the past decade alone. Our graphic below helps explain the how and why.
Of the two ice dams illustrated above, the Double Dam presents a couple of challenges beyond those of the regular ice dam. First, because ice has grown further up the roof slope, the subsequent leaks inside will cover a wider area. The second problem with a Double Dam is the cost of removal. Although half the thickness may take two to three times longer to remove than a regular ice dam. More time equals more money.
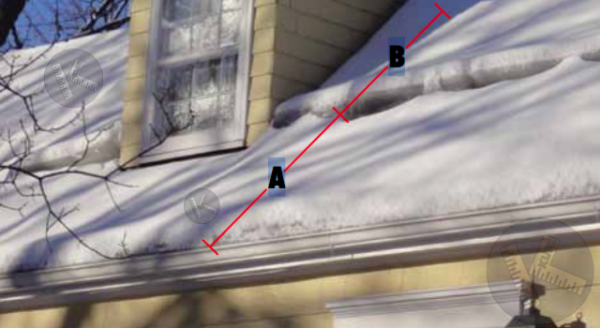
Shown above is a very typical Double Dam. This home in Edina had leaking from both ice dams and the cost to remove them was tremendous. Area A is where the average ice dam likes to form. Area B only forms when someone does an incomplete snow removal job from the roof. So what is the take-away from this case study? Remove all the snow from roof slopes than may produce an ice dam or remove none at all. While the latter may result in an ice dam happening at the very least it won’t be a Double Dam.
Minneapolis Cedar Roof Expert Gives Examples of Cedar Roof Repairs
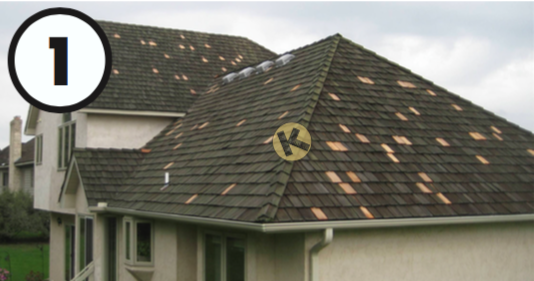
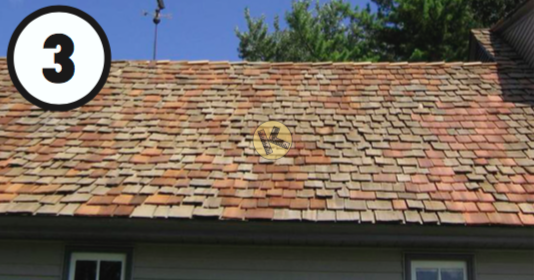
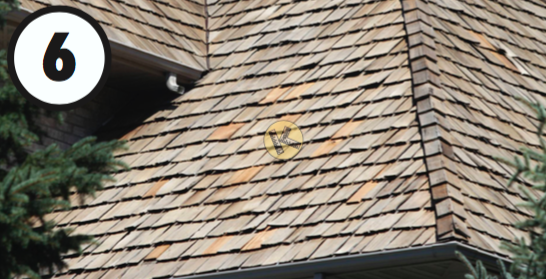
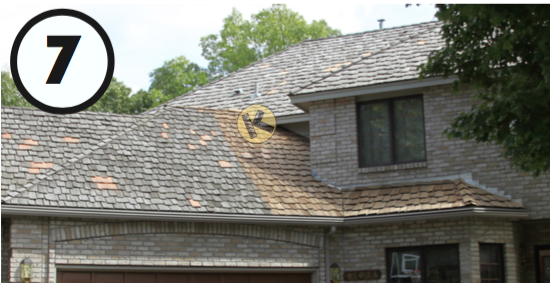
We are often asked about how cedar shake repairs will look compared to the surrounding roof. Here are a bunch of examples of projects where we repaired cedar shake roofs and the differing degrees color variation between new and old cedar materials. If a near match is your goal, you may consider having your roof washed.
Unwashed 19 year old shake roof with fresh repairs.
13 year old shake roof with area repair two years after installation.
Washed 17 year old shake roof with many repairs.
Washed shake roof with new repairs.
Unwashed 15 year old shake roof with repairs.
Washed 16 year old shake roof with repairs.
14 year old roof with small area washed. Note how the repairs blend differently in the washed and unwashed areas.
How to Age Copper to Blend in With Existing Copper by Creating a Patina
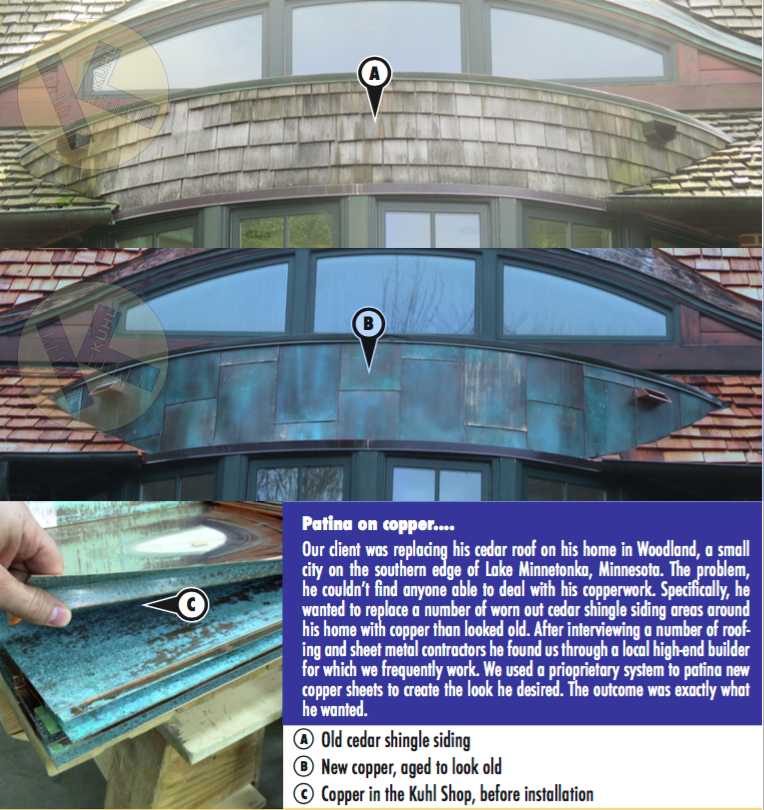
Patina on copper….
Our client was replacing his cedar roof on his home in Woodland, a small city on the southern edge of Lake Minnetonka, Minnesota. The problem, he couldn’t find anyone able to deal with his copper-work. Specifically, he wanted to replace a number of worn out cedar shingle siding areas around his home with copper that looked old. After interviewing a number of roofing and sheet metal contractors he found us through a local high-end builder for which we frequently work. We used a proprietary system to patina new copper sheets to create the look he desired. The outcome was exactly what he wanted.
Observations From the Experts on the Relationship Between Sun and Ice Dams
Experience tells us that all ice dams are created when there is an area of the roof that is above 32 degrees that creates snowmelt which then runs down to an area of the roof that is below 32 degrees. Seems logical enough. We also know that the cause of this temperature differential is more often than not the result of interior heat loss, specifically via air leaks and insulation issues relating to quality or quantity. There are, however, situations where perfectly constructed, well ventilated, air-sealed and insulated structures develop ice dams. This illustration describes such a situation.
In northern areas of the country the declination of the winter sun, mixed with the particular posture of a home on the land can result in certain areas of the roof never seeing direct solar radiation. Study the shadows above to see such an example. In this case, the sun heats up the roof pitch on the dormer (A), the resulting melt water runs down to an area of the roof (B) that never sees direct sun light and it refreezes as a result into an ice dam (C). These are particularly challenging ice dams to prevent. Often times heat cables are the only affordable option.
Using Insulation and Roofing to Address Chronic Ice Dam Issues in Minnesota
How to Prevent Ice Dams In Minnesota
Ice dam prevention in Minnesota is a tricky business. So much so that we hesitate to say any home is truly ice dam proof. It’s true that homes built after roof trusses became popular are far less likely to have ice dams than stick frame homes. There is simply more room in the roof system for insulation and ventilation, the two primary considerations when exploring ice dam issues on the standard home. A project we do quite frequently is shown in the photo below. We remove the roofing from the affected roof pitch, remove the roof decking, add high-performance spray foam urethane insulation and then re-roof using ice and water membrane to exceed Minnesota building code.
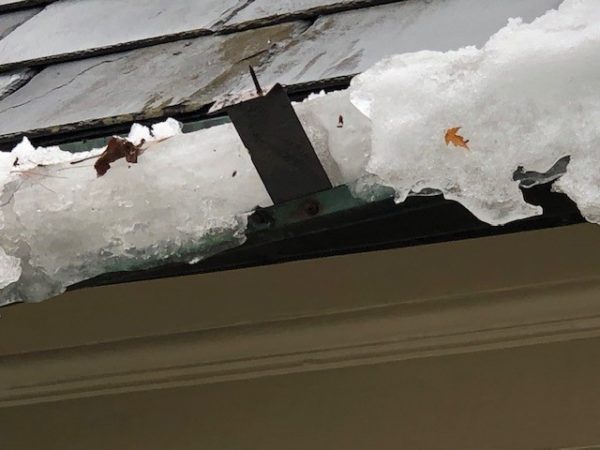
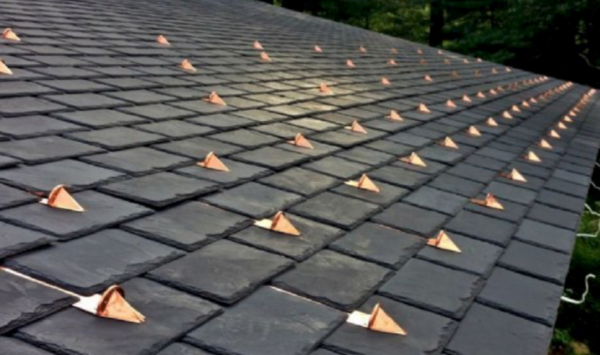
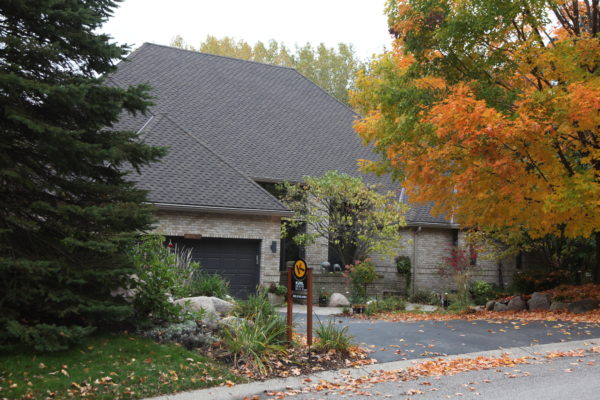
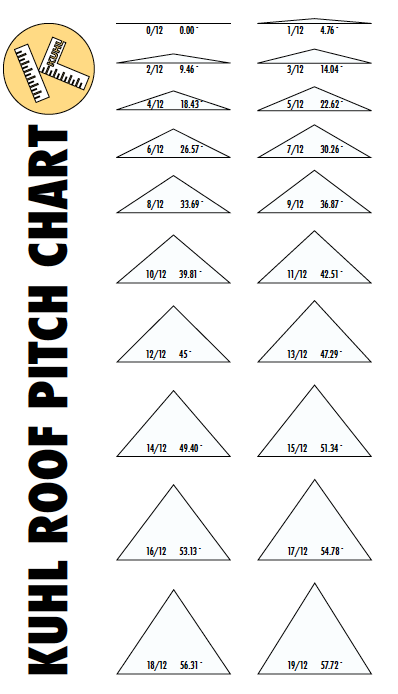
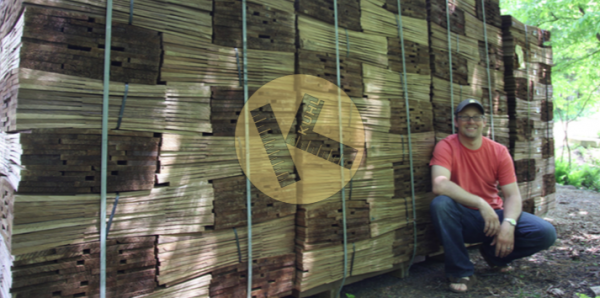
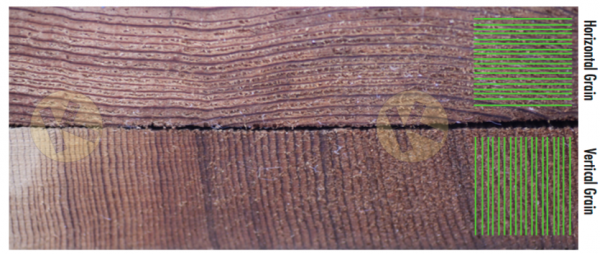
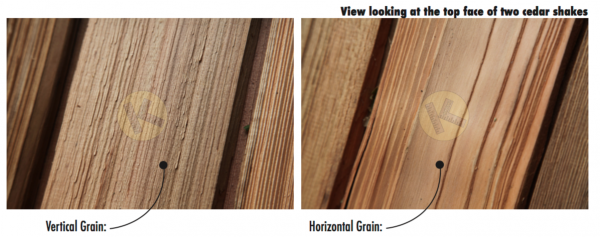
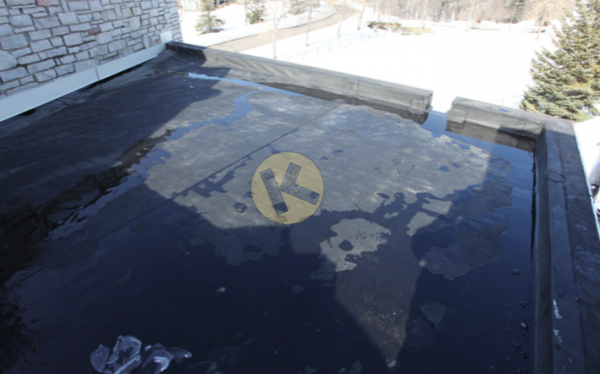
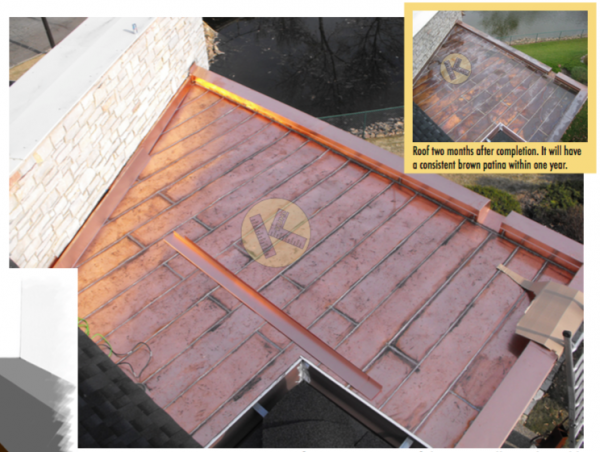
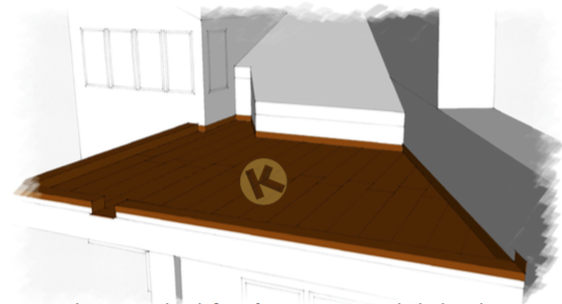

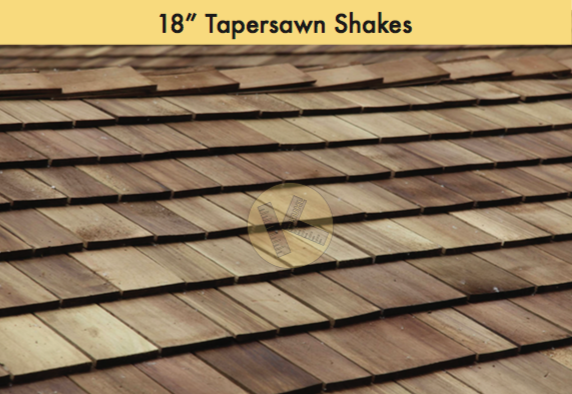
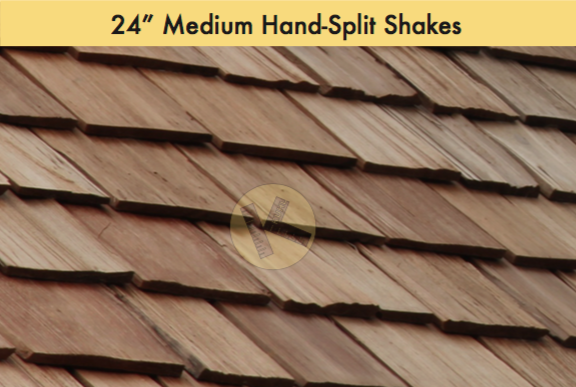
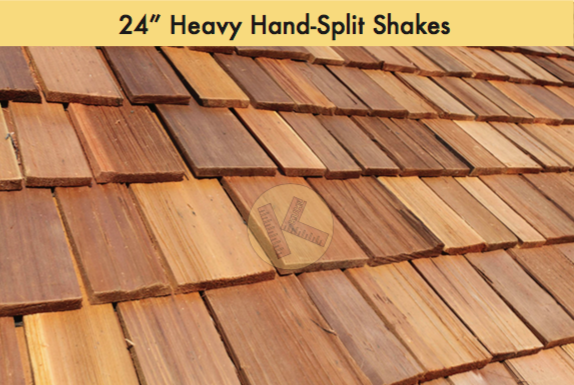
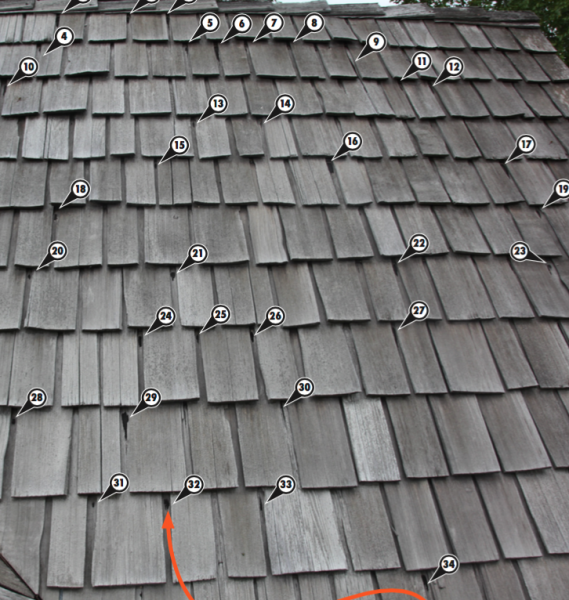
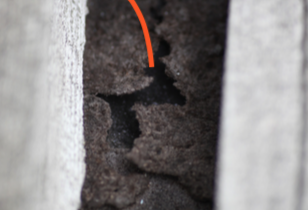
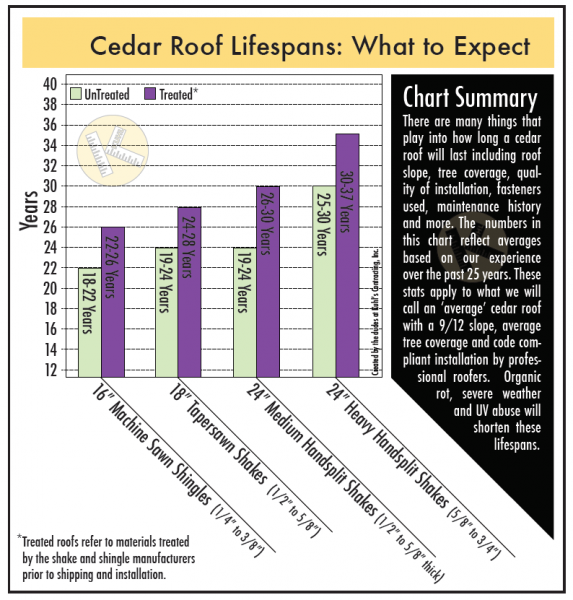
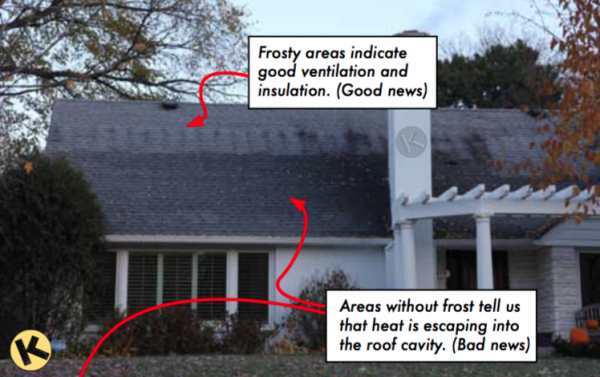
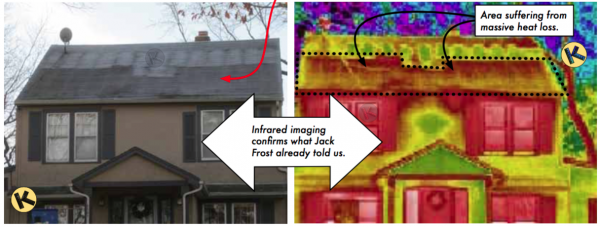
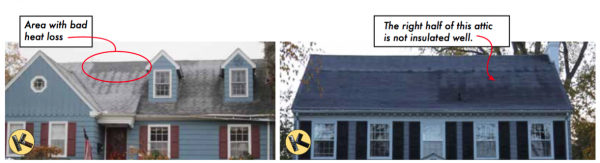
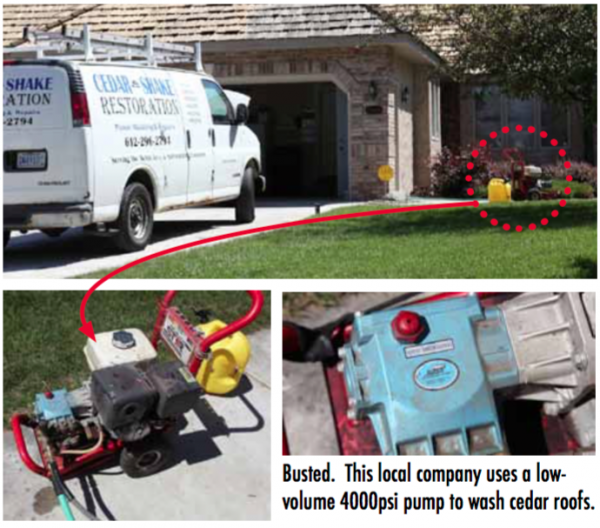
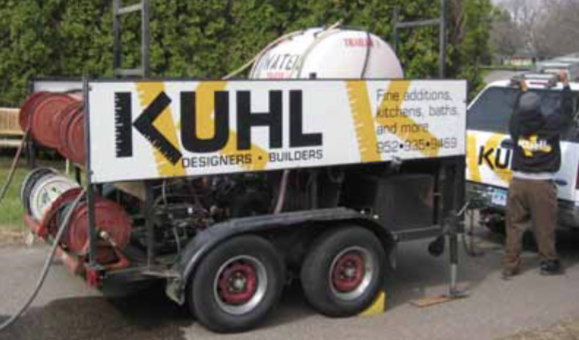
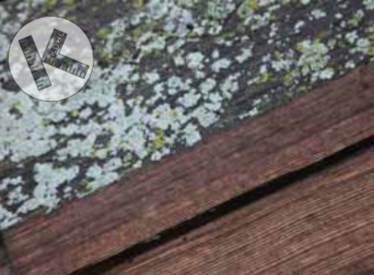
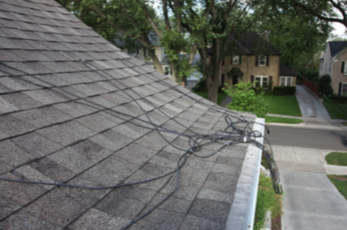
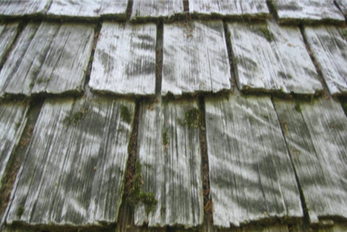
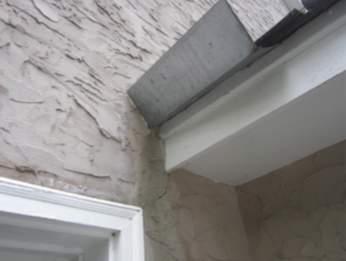
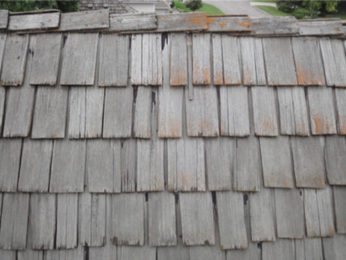
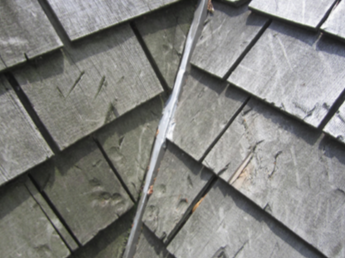
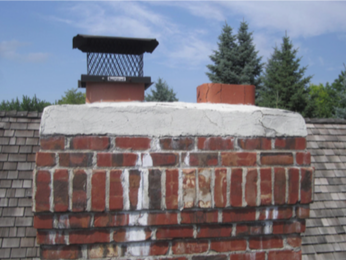
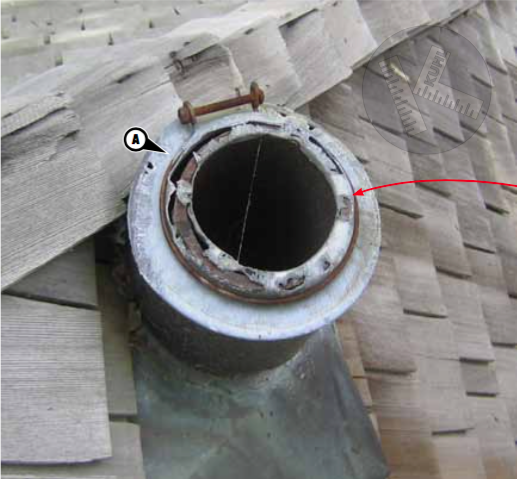
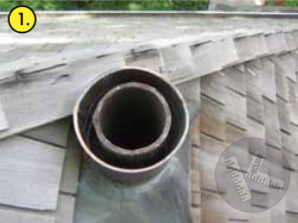
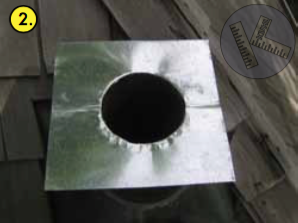
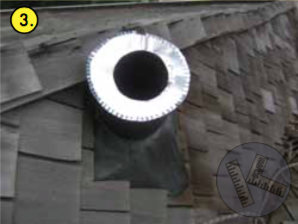
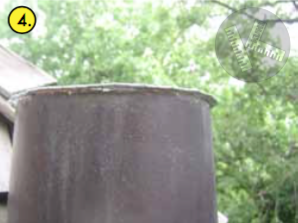
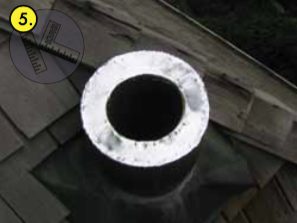
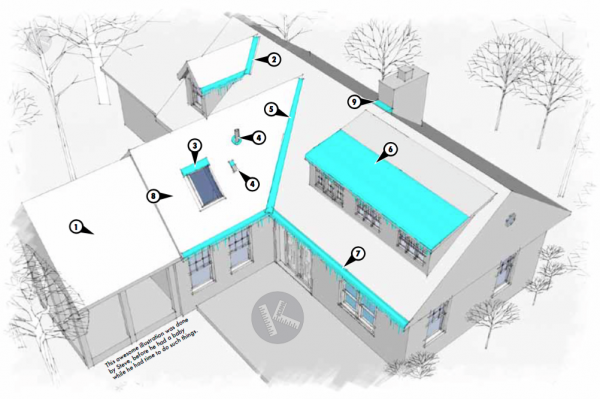
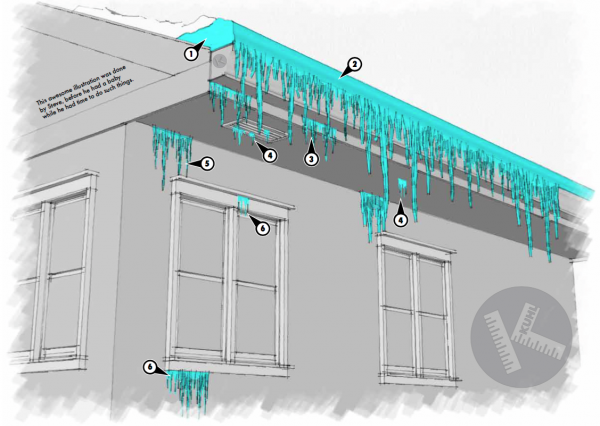
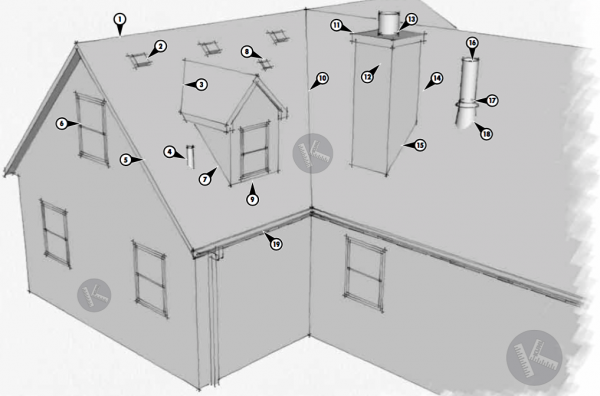
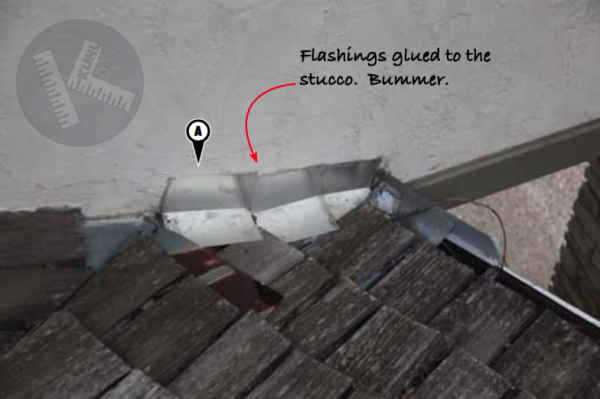

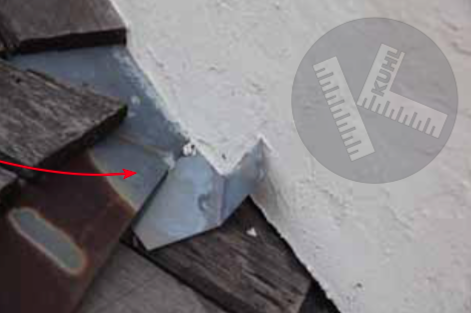
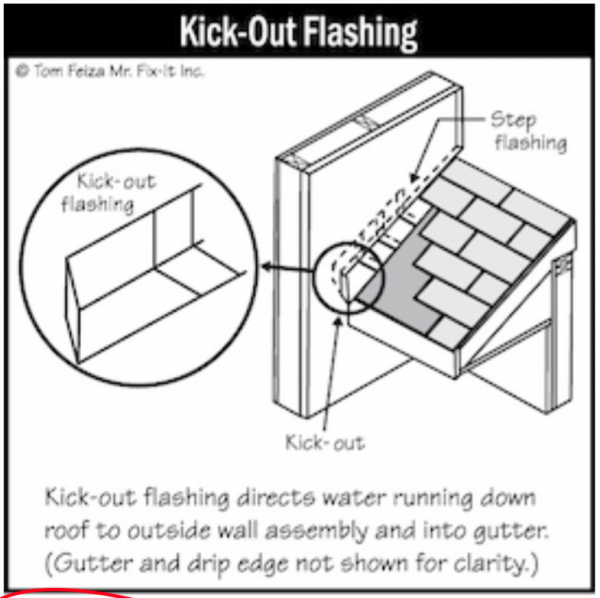
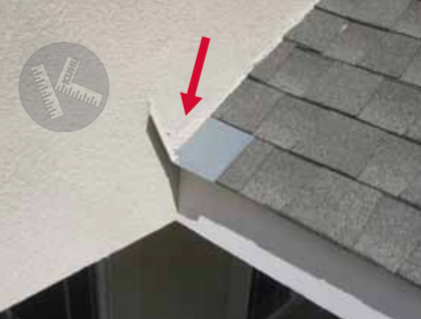
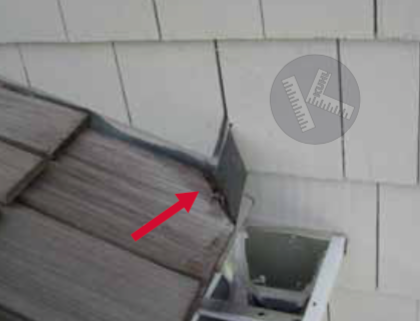
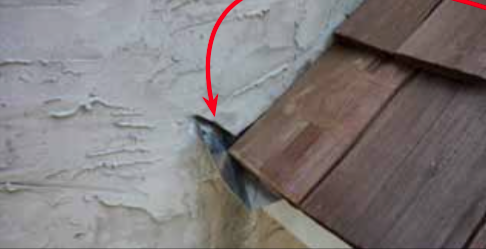
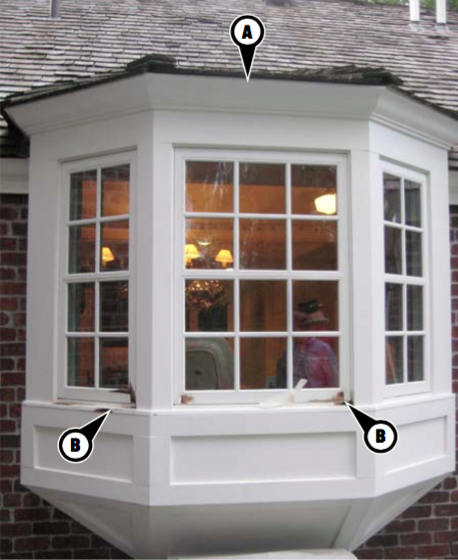
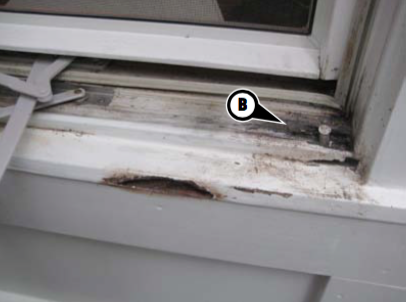
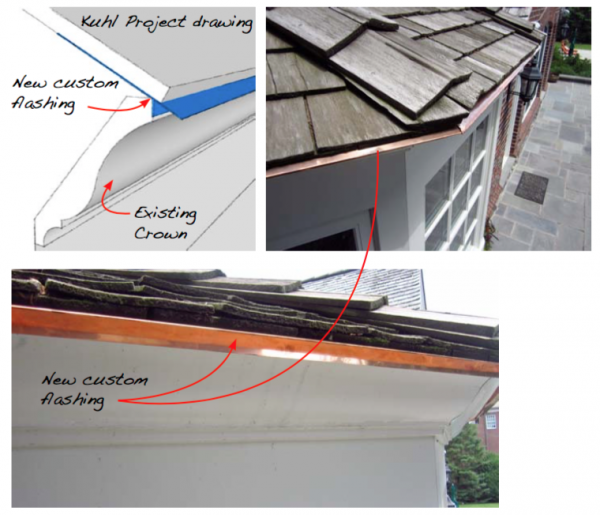
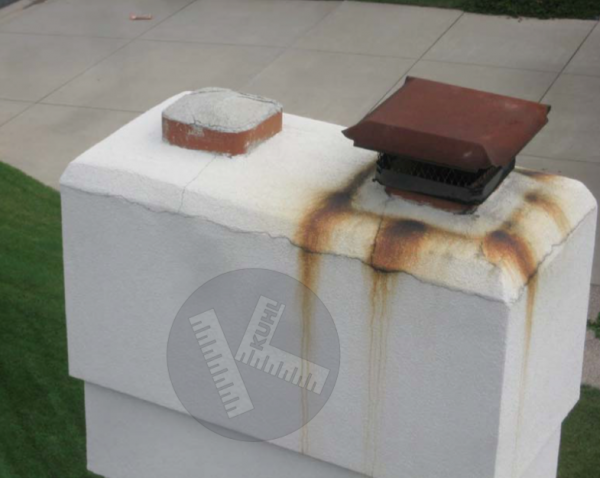 A leaking stucco chimney. The cap of the original chimney had a sloped mortar core with a top coat of stucco (portland cement). Bad idea. We don’t like stucco to be used on horizontal surfaces unless particular steps are taken. Water was leaking down into the chimney column and causing trouble below. Instead of rebuilding the upper portion of the chimney (big bucks) we advised our client to cover the existing cap with a custom copper chimney cap.
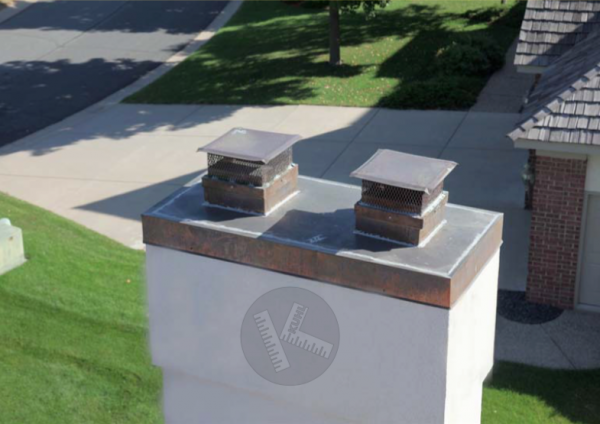 Many Kuhl solutions, such as this one, are based on a rendering produced specifically for each job. We would rather work out the details on the laptop than at your home as the work is underway. Plus, renderings allow us to have a conversation about design possibilites before any work begins. The copper chimney cap we built for this home cost roughly $1,200 to fabricate and install. It is a superior quality finished product that will stand the test of time and changing of seasons. What leaking stucco chimney?
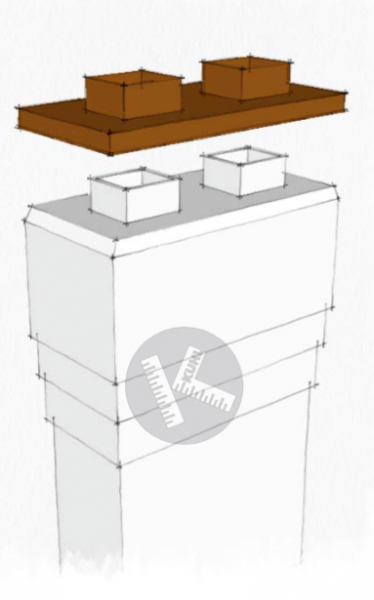
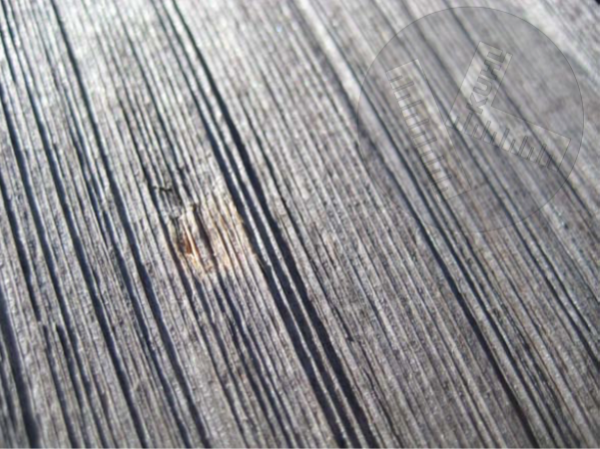 This is an impact mark from a .75” hail stone on a 3 year old medium hand-split cedar shake roof in Edina, Minnesota. Such hail frequently causes severe damage to cedar shake and shingle roofs. In this case the wood was resilient enough to escape with only a minor ding. Neighbors all around this home had their roofs replaced from the same hail storm. This roof sustained only cosmetic damage.
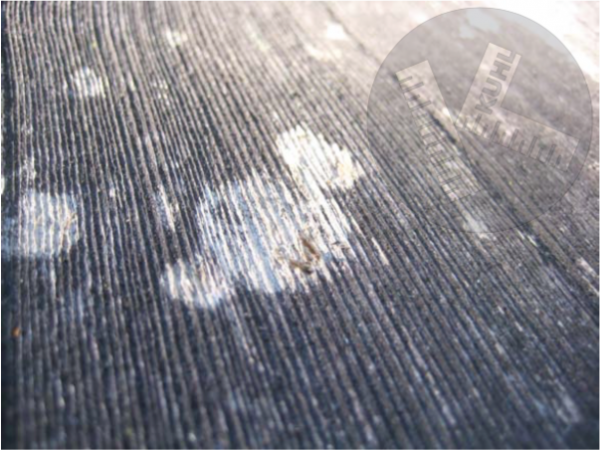 Here we see a 13 year old hand-split heavy cedar shake roof with heavy black mold and oxcidation. The direction of the hail storm resulted in glancing blows rather than perpendicular strikes. The discoloration on the surface of the cedar shake has been removed by the impact of the hail stone but no functional damaged was done that will affect the integrity of the shake.
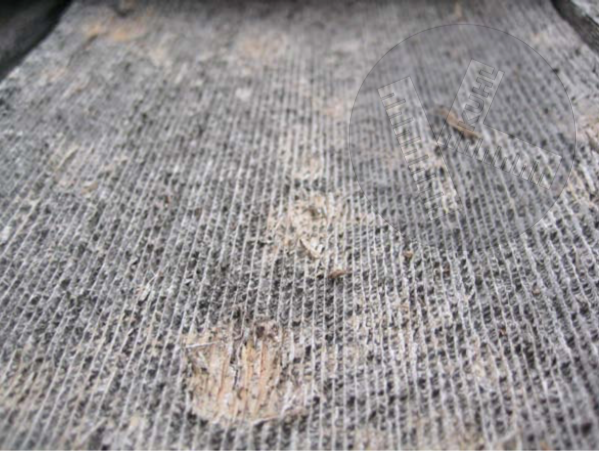 Hail storms in Minneapolis are all quite unique and localized. One neighborhood can be hit hard while the next one over barely gets hit at all. Pictured here is a 15 year old cedar shake roof in Plymouth, Minnesota after a severe hail storm. Not only was the hail .75” in diameter, it was very concentrated. While this particular cedar shake is more or less new many repairs were needed on this roof in other areas.
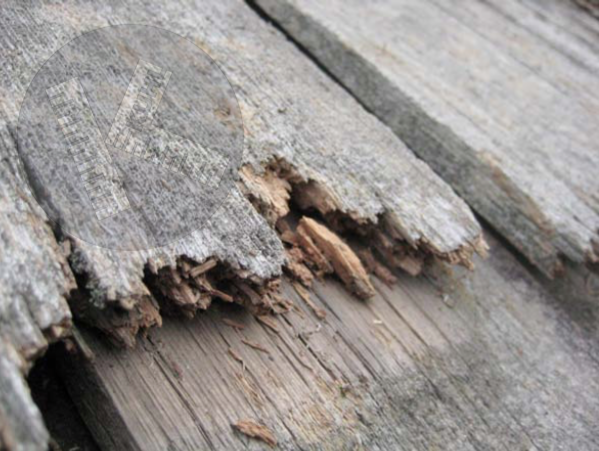 This cedar roof was 22 years old and was victim of a hail storm that went through Maple Grove a few years ago. The entire roof was littered with debris from the storm. There are a few interesting things to note: First notice how the cedar that was exposed as the result of the hail damage looks ‘fresh’, with orange coloring while the surrounding material is grey and weathered. Next, the hail damage is most severe on the butt edges of the shakes.
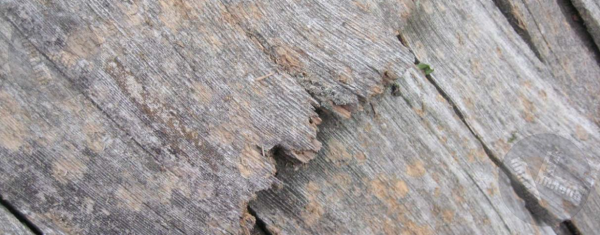 3/4” to 1” hail really whacked this poor roof on Lake of the Isles in Minneapolis. The material was 22 years old and was somewhat brittle prior to the hail storm. This enhanced the affect of every hail stone impact by allowing deeper penetration. Even if this roof were 5 years old at the time of this event it would have hail damage. The reason being that it is less brittle at 5 years old than 22 years old. The damage seen on older cedar shake roofs, such as this one, are in direct proportion to the
 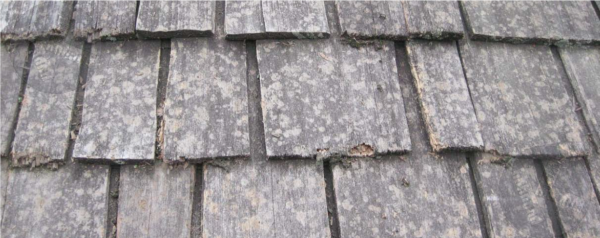 This is the same cedar shake roof on Lake of the Isles, Minneapolis. It’s common to see different hail damage from one roof slope to the next. There are two reasons for this. The first reason is that hail storms normally throw hail from a dominant direction and the force of the hail impact is increased as the strike angle becomes more perpendicular (as opposed to glancing strikes). All of the south facing slopes can be trashed while the north facing areas are barely affected, for example. The second reason is that the orientation of a roof will affect how the wood ages significantly. Northern slopes tend to maintain hardness and integrity longer than south-facing slopes. Other factors such as tree coverage, roof pitch (steepness) and maintenance history factor in as well.
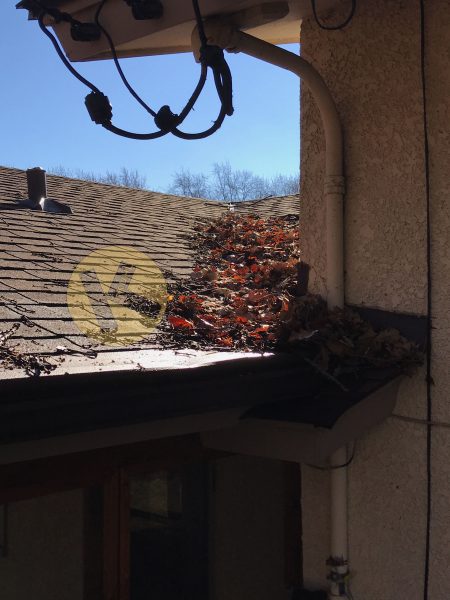
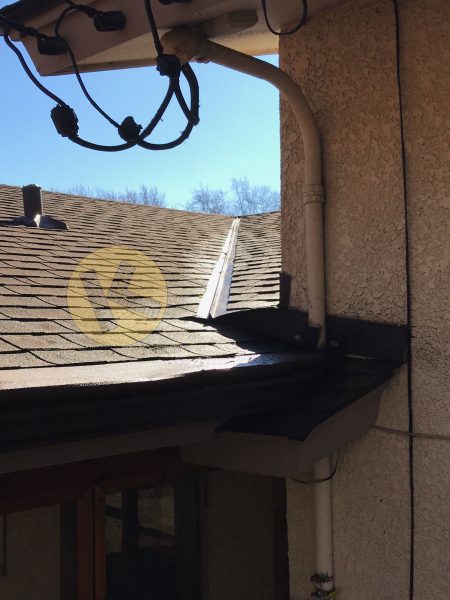
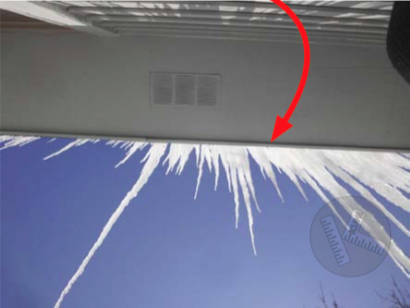
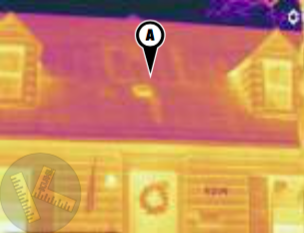
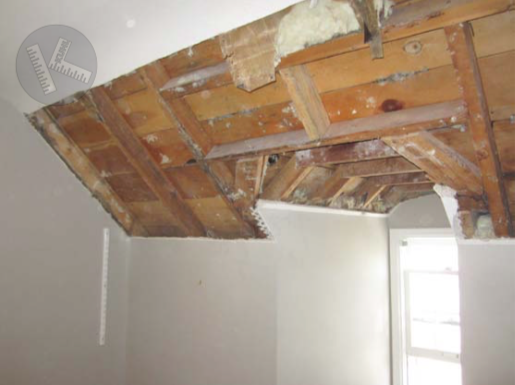
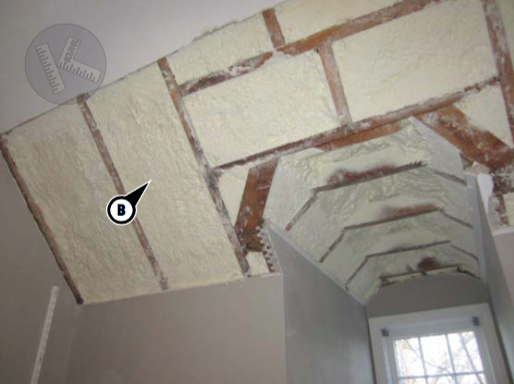
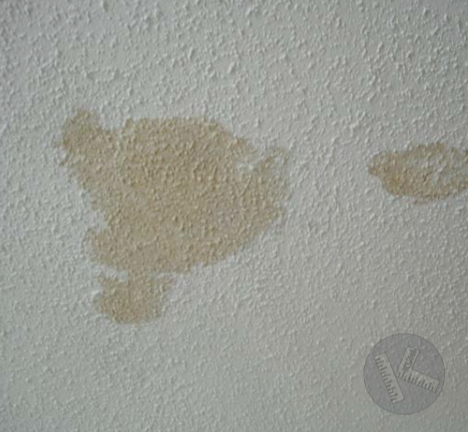
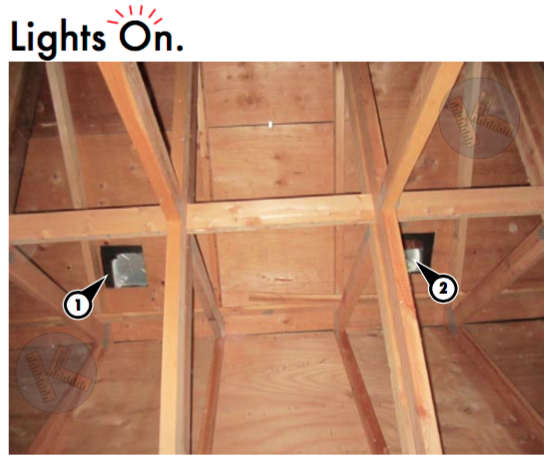
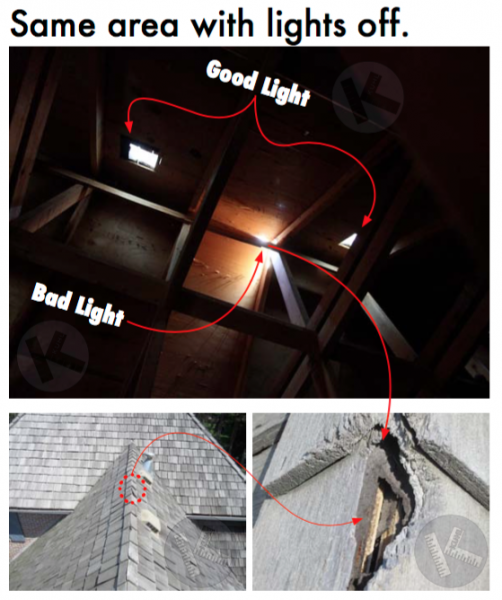
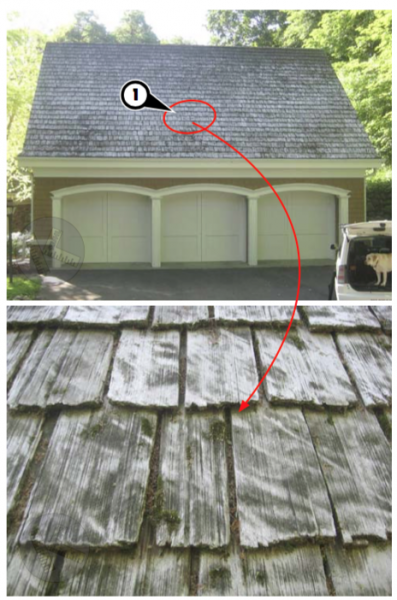
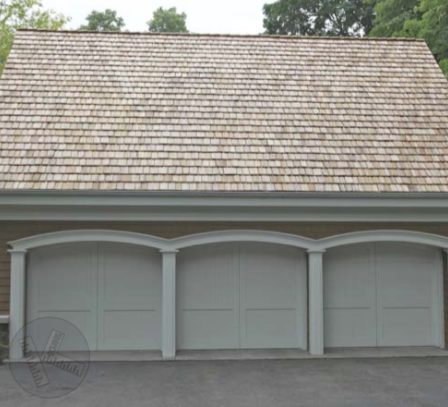
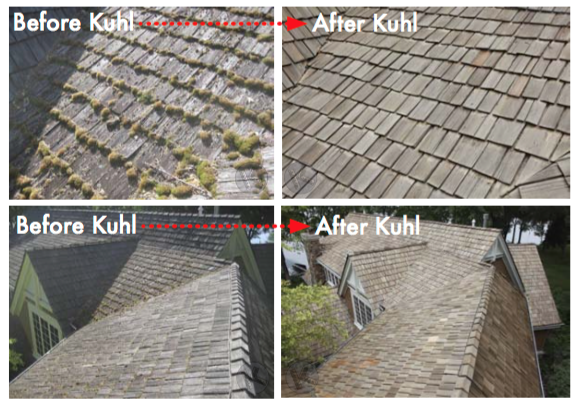
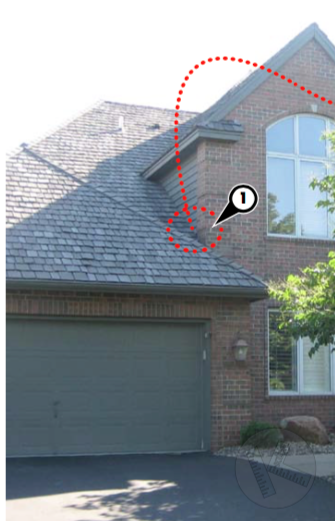
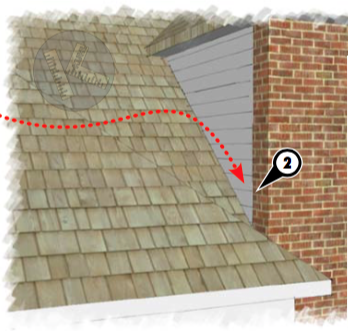
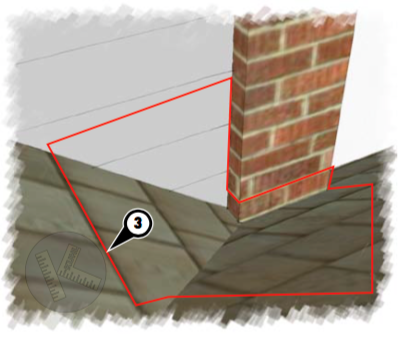
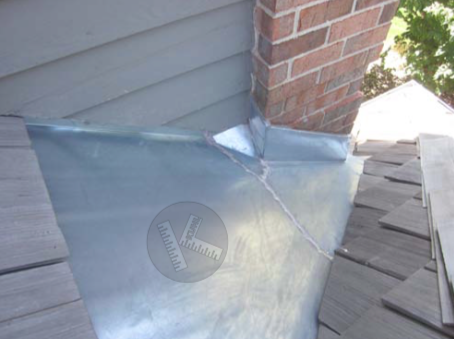
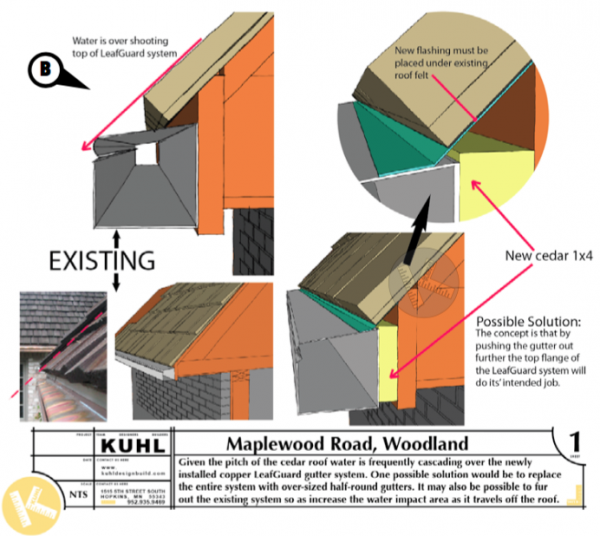
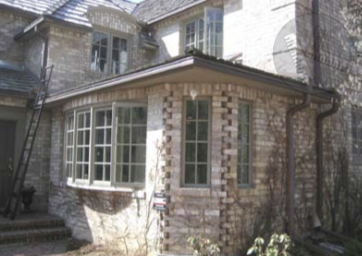
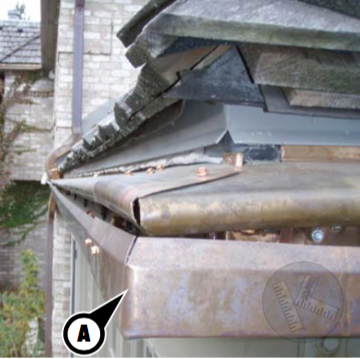
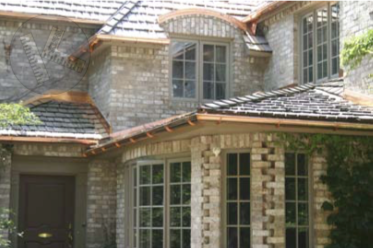
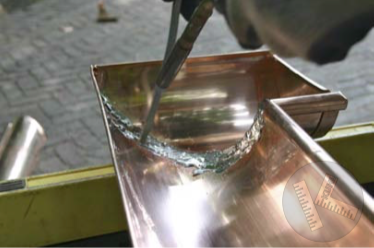
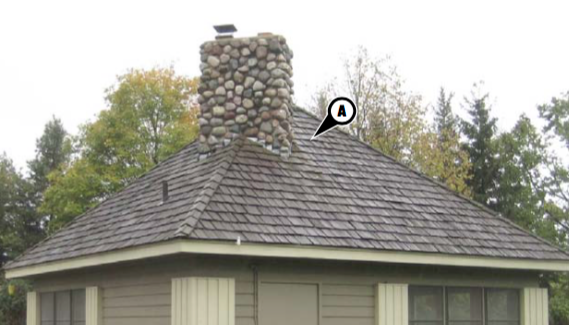
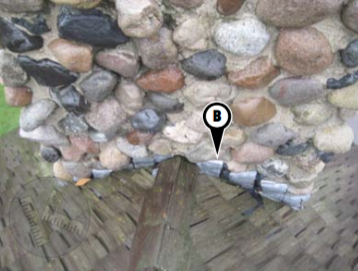
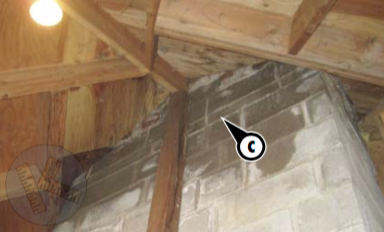
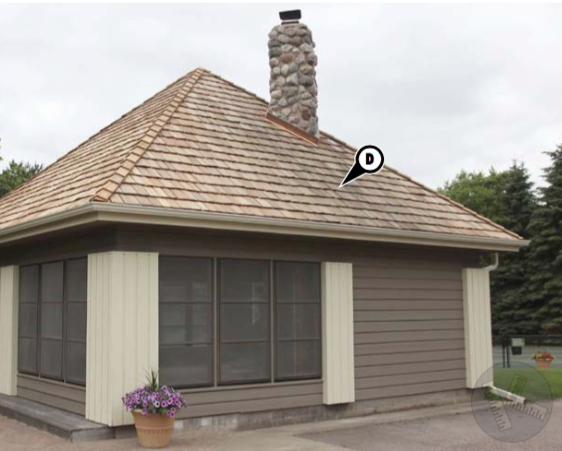
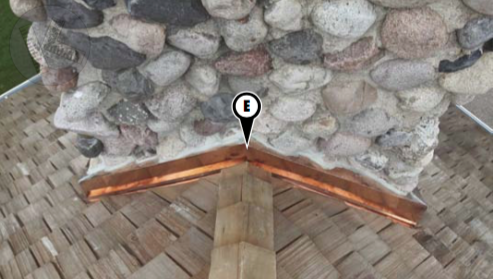
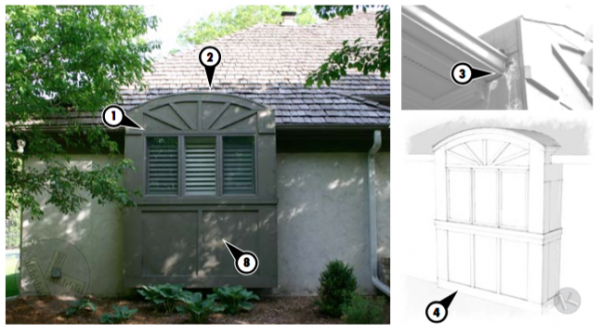
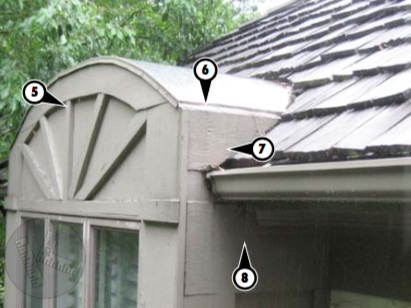
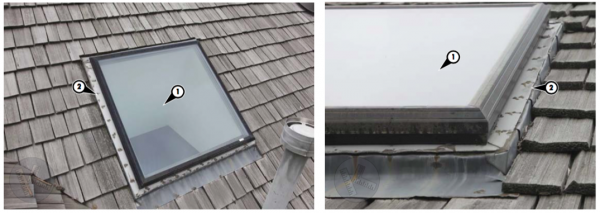
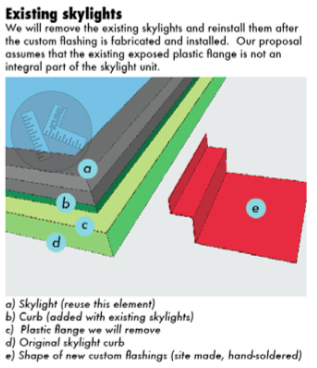
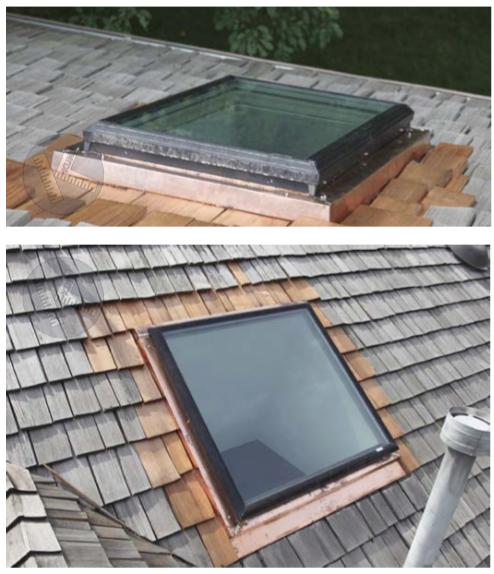
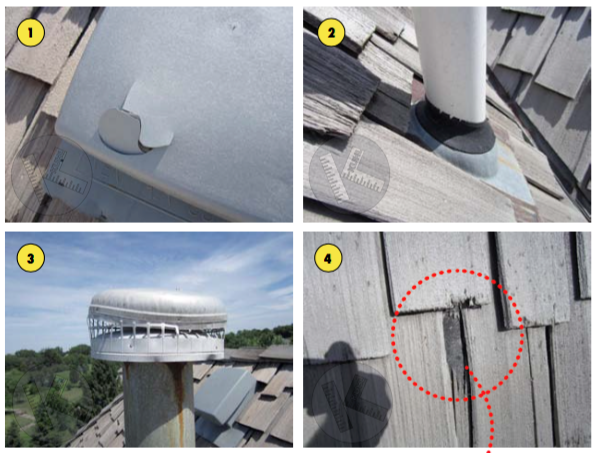
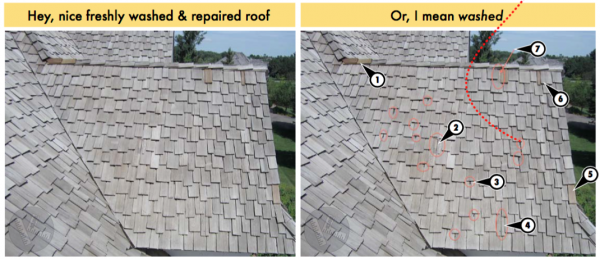
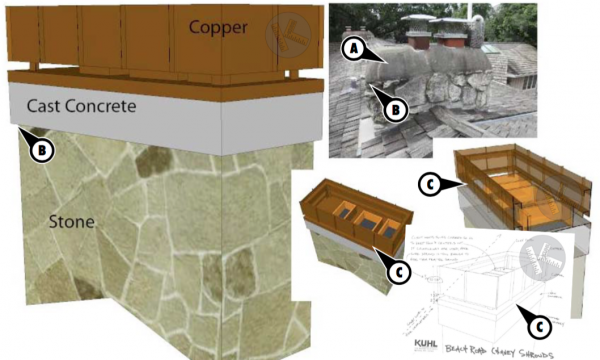
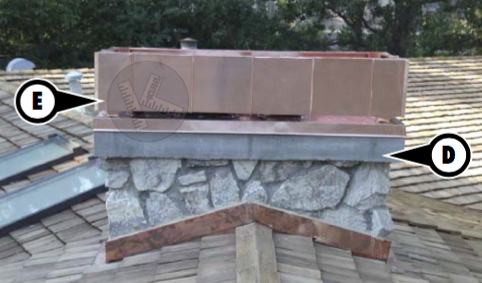
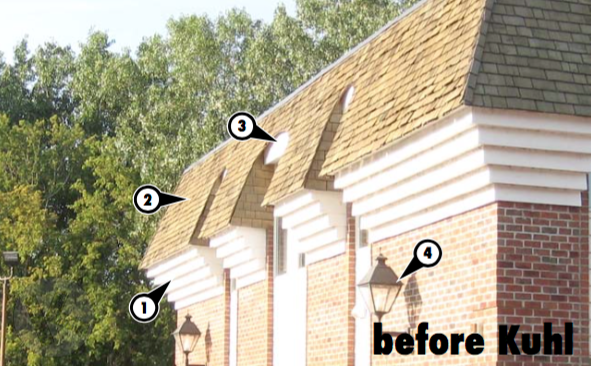
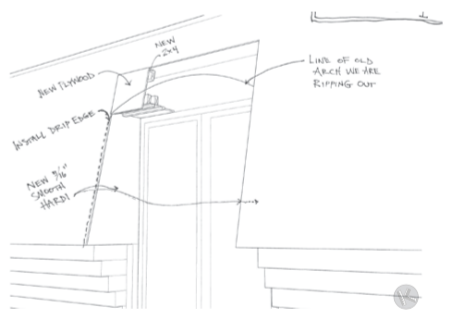

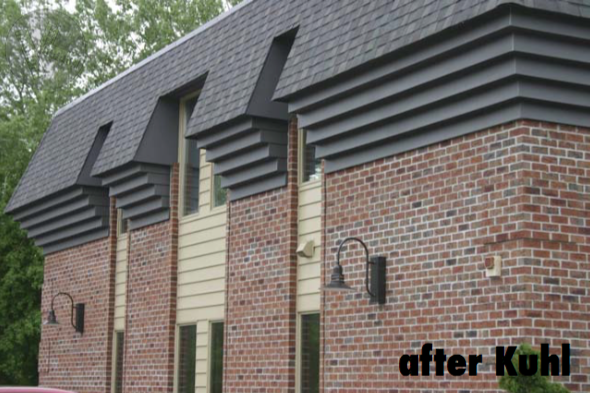
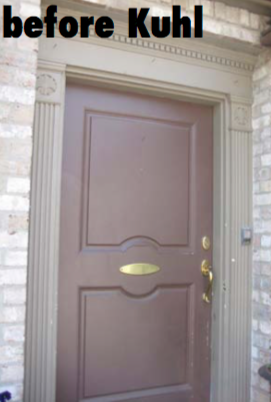 The Problem: You have a really nice home with a really crappy front door. That’s no way to welcome your guests.